
>>

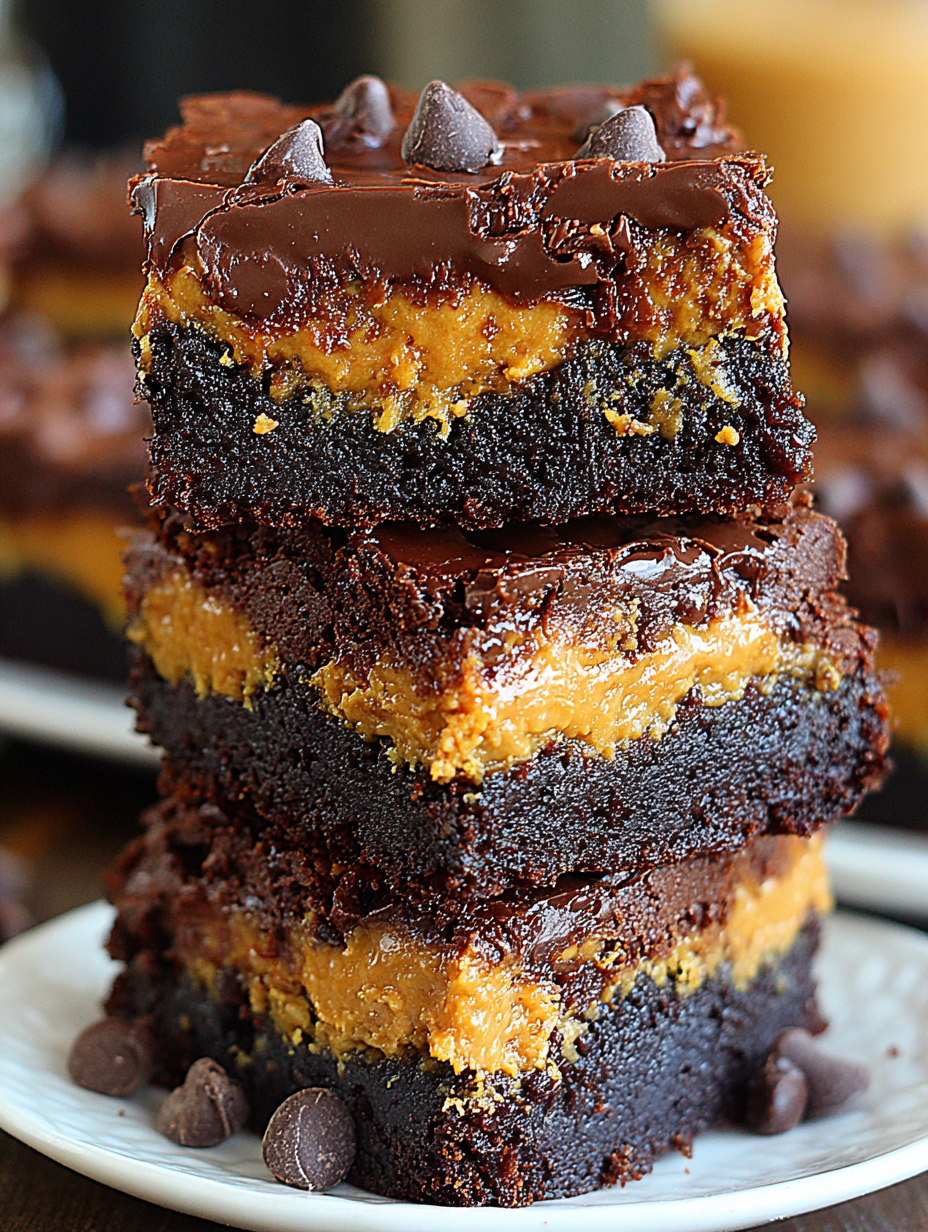
Wow your tastebuds with the BEST peanut butter brownies ever — fudgy, flourless, and finished with a silky ganache. Naturally gluten-free and no mixer required!

This batch of peanut butter brownies has been my secret party trick for years. I first developed this version on a rainy Sunday afternoon when I wanted something deeply chocolatey but also a little nostalgic — peanut butter always does that for me. The pumpkin pies and layer cakes at family gatherings are beautiful, but these bars get the real attention: they are fudgy, chewy, and dense in a way that makes spoons unnecessary. I remember testing the first pan while my kids watched with wide eyes; the warm squares disappeared faster than I could snap a photo.
What makes this version different is the flourless, cornstarch-thickened base that creates a brownie with a molten interior and a slightly crisp top. Add a ribbon of peanut butter filling and a glossy ganache, and you have dessert that reads elegant but comes together without a stand mixer. I love that these are naturally gluten-free and forgiving for bakers of all skill levels. Whether you need a last-minute potluck contribution or a Sunday treat to savor with coffee, these bars are a crowd-pleaser and a personal favorite.
My family’s reaction the first time I served these was immediate and unanimous: silence while everyone concentrated, then requests for the recipe. I made them for a neighborhood bake sale once and sold out within an hour — a rare feat for any dessert in our area.
 Make the ganache:
Place 10 ounces chopped bittersweet chocolate in a heatproof bowl. Heat 1/2 cup heavy cream until scalding (do not boil) and pour over the chocolate. Let sit for 5 minutes, then stir until smooth. If needed, microwave in 15-second bursts to finish melting.
Finish and chill:
Pour ganache over the cooled brownies and spread with an offset spatula until even. Refrigerate until ganache is fully set — at least 30–45 minutes — for cleaner slicing.
Slice and store:
Use the parchment overhang to lift brownies from the pan. Cut into 36 squares with a sharp knife, wiping the blade between cuts for neat edges. Store in an airtight container in the refrigerator for up to 3 days.
Make the ganache:
Place 10 ounces chopped bittersweet chocolate in a heatproof bowl. Heat 1/2 cup heavy cream until scalding (do not boil) and pour over the chocolate. Let sit for 5 minutes, then stir until smooth. If needed, microwave in 15-second bursts to finish melting.
Finish and chill:
Pour ganache over the cooled brownies and spread with an offset spatula until even. Refrigerate until ganache is fully set — at least 30–45 minutes — for cleaner slicing.
Slice and store:
Use the parchment overhang to lift brownies from the pan. Cut into 36 squares with a sharp knife, wiping the blade between cuts for neat edges. Store in an airtight container in the refrigerator for up to 3 days.
My favorite part of making these is watching the moment the ganache sets and the top takes on a glossy sheen — it feels like frosting a cake, but easier. I still remember a holiday cookie swap where one neighbor traded me a jar of preserves for a pan of these; that’s how you know you’ve got a keeper.
Store cooled squares in a single layer in an airtight container in the refrigerator for up to three days. For longer storage, freeze wrapped bars for up to three months; thaw overnight in the fridge before serving. When refrigerating, place a piece of parchment between layers to prevent sticking. To refresh slightly hardened ganache before serving, let bars sit at room temperature for 20 minutes so the texture becomes softer but still holds shape.
If you prefer almond butter or sunflower seed butter (for a peanut-free option), use a 1:1 swap in the filling. For dairy-free ganache, substitute full-fat coconut cream for heavy cream and use dairy-free chocolate. If you don't have cornstarch, arrowroot at the same volume works but may give a slightly different chew. Using all dark chocolate chips yields a richer, less sweet result — adjust sugar slightly for your taste.
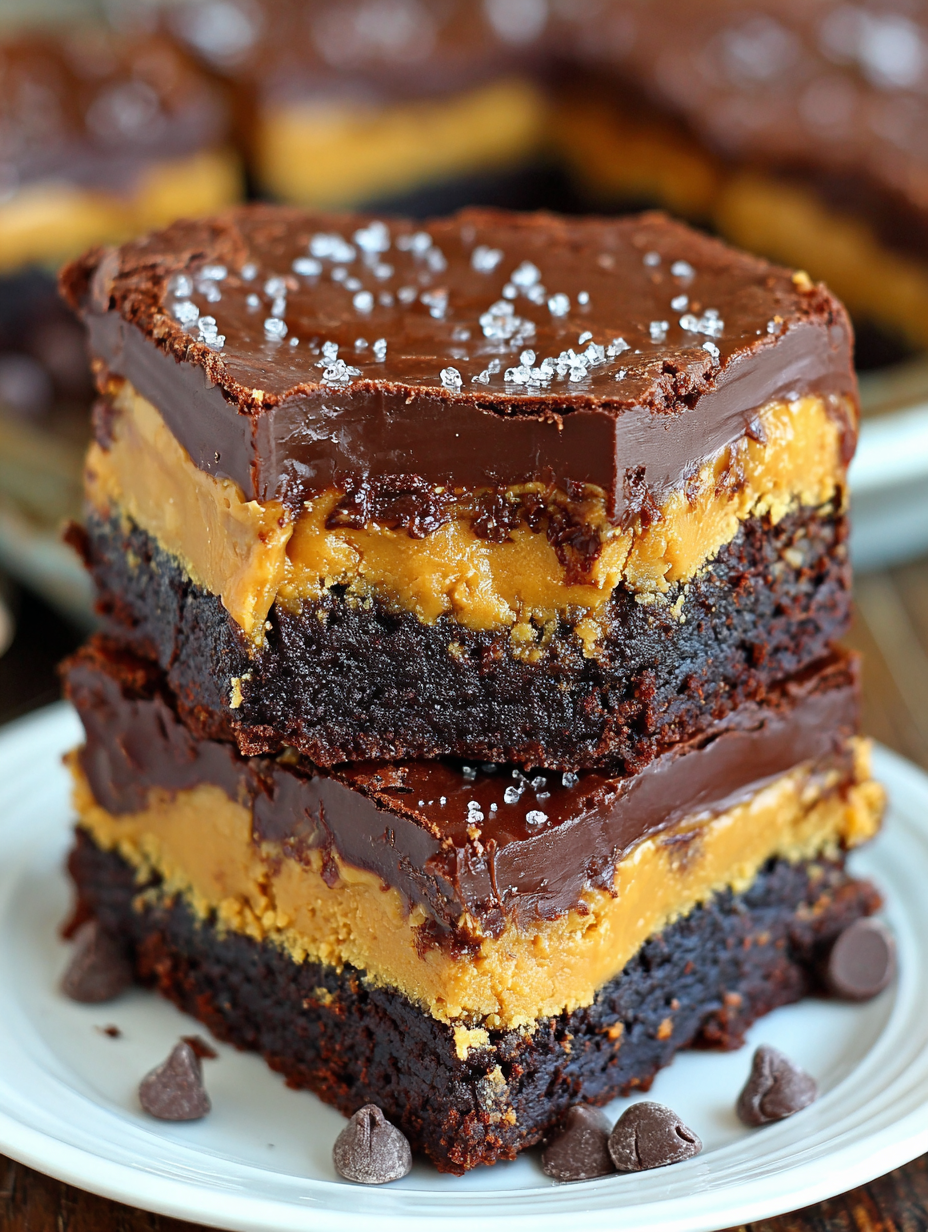
Serve squares slightly chilled or at cool room temperature with a dollop of whipped cream or a scoop of vanilla ice cream. A sprinkle of flaky sea salt on the ganache elevates the chocolate and peanut butter interplay. These bars pair beautifully with coffee, milk, or a robust dessert wine when entertaining.
Brownies are an American classic with roots in late 19th-century cookery; this variation pays homage to the peanut butter and chocolate pairings popularized in mid-century baking. The flourless approach is influenced by densely textured European chocolate tortes, while the ganache finish nods to French patisserie technique.
For fall, fold in a pinch of cinnamon and top with crushed roasted peanuts. For the holidays, swirl in peppermint extract into a portion of the ganache or sprinkle crushed candy canes after pouring. In summer, serve chilled with fresh berries to cut through the richness.
To prepare for a week of treats, bake a pan on Sunday and refrigerate. Slice into individual portions and store in single-serve containers for grab-and-go desserts. If freezing, separate layers with parchment and label with date; thaw in the fridge overnight the day before serving.
These bars are a reliable favorite because they combine nostalgia with technique — approachable for busy bakers yet sophisticated in flavor. Make a batch, share generously, and enjoy the smiles that follow.
Use room-temperature eggs for a smoother, more cohesive batter and better rise.
Cool the pan completely before pouring ganache to avoid melting and pooling.
Wipe the knife between cuts for neat squares and cleaner presentation.
If ganache seizes, warm gently in 10-second microwave bursts and stir until smooth.
This nourishing peanut butter brownies recipe is sure to be a staple in your kitchen. Enjoy every moist, high protein slice — it is perfect for breakfast or as a wholesome snack any time.
This Peanut Butter Brownies recipe makes perfectly juicy, tender, and flavorful steak every time! Serve with potatoes and a side salad for an unforgettable dinner in under 30 minutes.
Preheat oven to 350°F. Lightly spray a 9-inch square pan and line with parchment leaving an overhang for easy removal.
In a medium bowl, combine 3/4 cup peanut butter, 1/2 cup granulated sugar, and 1 large egg. Mix until smooth and set aside.
Combine 12 ounces chocolate chips and 6 tablespoons cubed butter in a microwave-safe bowl. Microwave in 30-second increments, stirring between each, until melted and glossy.
Stir in 3/4 cup sugar and 1 teaspoon vanilla. Add eggs one at a time, stirring after each addition until fully incorporated.
Whisk together 1/4 cup cocoa powder, 1/3 cup cornstarch, and 1/2 teaspoon salt. Add to the chocolate mixture and stir vigorously until smooth and it begins to pull away from the bowl sides.
Stir in 1 cup mini chips. Pour two-thirds of batter into prepared pan, drop spoonfuls of peanut butter filling over top, then spoon remaining batter to cover.
Bake for 33–37 minutes or until a toothpick comes out with a few moist crumbs. Watch closely after 30 minutes to avoid overbaking.
Cool brownies completely on a rack or chill in the refrigerator. Ganache requires fully cooled bars to set properly.
Place 10 ounces chopped bittersweet chocolate in a bowl. Heat 1/2 cup heavy cream until scalding and pour over chocolate. Let sit 5 minutes, then stir until smooth.
Pour ganache over cooled brownies, smooth, and refrigerate until set. Use parchment overhang to lift and cut into 36 squares.
Last Step: Please leave a rating and comment letting us know how you liked this recipe! This helps our business to thrive and continue providing free, high-quality recipes for you.
Leave a comment & rating below or tag
@platemint on social media!

Saucy, cheesy baked ziti with ricotta and basil tastes like lasagna in half the effort, perfect for weeknights or crowds.

Quick, crowd-pleasing cheeseburger sliders baked golden with melty cheddar and savory beef. Ready in 30 minutes, great for parties and easy meal prep.

Crispy air fryer sweet potato fries with tender centers, fast-food flavor without deep frying. Ready in minutes and irresistibly snackable.
Leave a comment & rating below or tag @platemint on social media!
Enjoyed this recipe? Share it with friends and family, and don't forget to leave a review!
This recipe looks amazing! Can't wait to try it.
Comments are stored locally in your browser. Server comments are displayed alongside your local comments.

Join to receive our email series which contains a round-up of some of our quick and easy family favorite recipes.
