
>>

A quick, portable dessert layered in mason jars: sweet cinnamon apples, creamy no-bake filling and crunchy graham crumbs — ready in 15 minutes and perfect for parties or make-ahead treats.
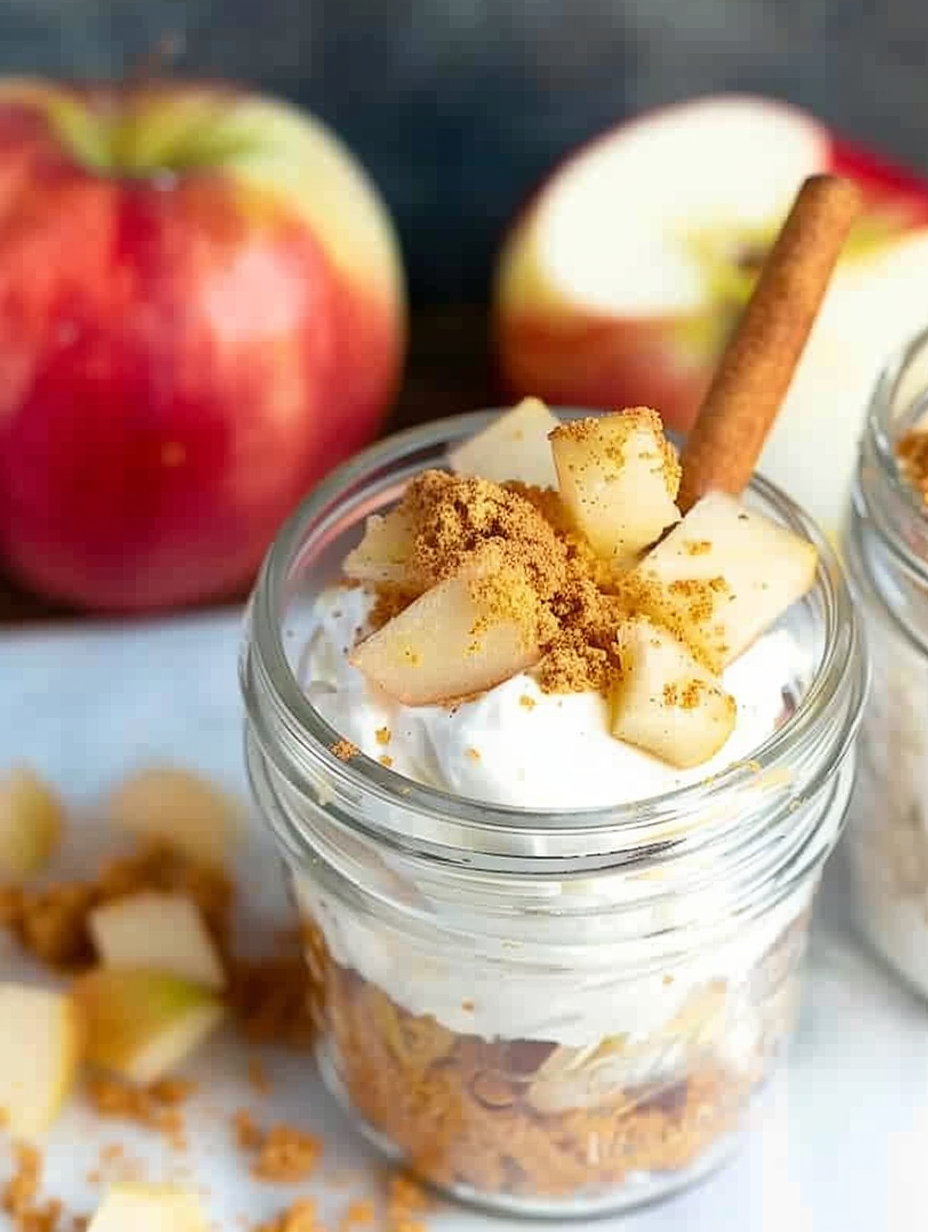
This No Bake Apple Pie Cheesecake in a Jar became one of my go-to treats the first week of apple season. I was trying to create a dessert that captured the nostalgic flavors of a slice of warm apple pie without turning on the oven, and the result felt like tiny handheld pies with the silkiness of cheesecake. I discovered this combination on a busy weekend when I wanted something impressive but fuss-free; friends kept asking for the recipe and I loved how portable the jars made serving simple. The contrast between warm cinnamon apples, cool cheesecake filling and buttery graham crumbs is the kind of texture play that keeps people coming back for another spoonful.
What makes this version special is the balance: crisp-tender apples cooked briefly in coconut oil and brown sugar, a tangy-sweet cream cheese layer spiked with Greek yogurt and agave, and the crunchy graham base repeated in layers for maximum bite. I usually make a double batch for gatherings because the jars disappear quickly — and they’re perfect for portion control and gifting. The whole assembly takes about 15 minutes active time; you can serve immediately for a lively contrast of temperatures or chill for an hour to let flavors marry.
I first served these jars at a neighborhood potluck and watched people debate whether it was pie or cheesecake — they loved the tidy portions and the bright apple flavor. My kids call them "little parfait pies" and always want to help layer, which makes them a great recipe to share with young bakers.

My favorite part is how forgiving the assembly is — imperfect layers still taste fantastic. At a summer picnic I watched guests trade jars because someone preferred more apples and another wanted extra crumb; it’s a small, shareable dessert that invites personalization.
Store covered in the refrigerator for up to 7 days. Use airtight lids or plastic wrap pressed directly onto the filling surface to minimize moisture. If you plan to make these ahead, keep crumb layers separated and add a final sprinkle of crumbs just before serving to preserve crunch. When reheating, warm the apples gently in a microwave-safe bowl for 20–30 seconds and spoon over chilled filling to recreate the contrast of warm fruit and cool cream. Use glass jars with tight-fitting lids for longevity and easy transport.

If you need to swap items, here are reliable options: replace coconut oil with unsalted butter for classic flavor; use honey or maple syrup instead of agave at a 1:1 ratio; choose low-fat cream cheese and Greek yogurt for a lighter version (note: texture will be softer). For a nutty twist, fold 2 tablespoons of finely chopped toasted pecans into the crumb layers. To make it gluten-free, select certified gluten-free graham crumbs or use crushed gluten-free cookies. Finally, if you want a vegan version, use plant-based cream cheese and yogurt, and replace agave with maple syrup, but expect a change in texture and tang.
Serve these jars chilled or with the apples slightly warm for contrast. Garnish with a light dusting of cinnamon, a thin apple slice fan, or a small sprig of mint. They pair beautifully with spiced coffee, chai or a scoop of vanilla ice cream for a plated dessert. For brunch, present them alongside cinnamon-swirled oat muffins and a fruit platter. The mason jar presentation makes them ideal for outdoor events — stack in a cooler on ice and serve with tiny spoons.
This handheld fusion borrows from two American classics: the apple pie, a deeply rooted symbol of home and harvest, and the no-bake cream cheese dessert tradition often seen in quick summer menus. Layering desserts in jars has gained popularity for its convenience and aesthetic; it’s a practical evolution of parfaits and trifle, marrying the comforting spices of apple pie with the rich tang of cheesecake. This version celebrates the bounty of fall apples while keeping the spirit of informal, community-oriented eating intact.
In fall, emphasize firm, aromatic apples like Honeycrisp or Jonagold and add a pinch of ground cloves to deepen the spice. For winter holidays, fold a tablespoon of cranberry compote into the apple layer. In spring and summer, swap to pears and lemon zest for a brighter profile. For Thanksgiving, double the recipe and serve in larger jars or small glasses as an easier alternative to baking a full pie.
Make the apple mixture and filling up to three days ahead; store each in airtight containers in the fridge. Assemble jars the day of serving for optimal texture, or pre-layer fully if convenience is crucial — but expect the crumbs to soften over time. Use 8-ounce mason jars for standard servings; label jars with the assembly date. When transporting, keep jars upright in a secure box and chill upon arrival to maintain structure.
These little jars have become my shorthand for effortless hospitality: they travel well, look pretty, and taste like a small indulgence. Try them once and I guarantee they’ll become a staple whenever you want something that feels homemade but takes almost no time.
Soften cream cheese to room temperature for at least 30 minutes to avoid lumps in the filling.
Toast graham crumbs lightly in a dry skillet for 2–3 minutes for extra depth and crunch.
If the apple mixture looks dry, add 1 teaspoon of water while cooking to help caramelize without burning.
Press crumb layers gently to compact them and create cleaner, more defined layers.
Chill jars for at least 30 minutes for a firmer mouthfeel; serve immediately if you prefer warm apples.
This nourishing no bake apple pie cheesecake in a jar recipe is sure to be a staple in your kitchen. Enjoy every moist, high protein slice — it is perfect for breakfast or as a wholesome snack any time.
Yes — store sealed in the refrigerator for up to 7 days. For best texture, add an extra sprinkle of graham crumbs right before serving.
Use full-fat cream cheese and Greek yogurt for the creamiest, most stable texture; low-fat versions will be looser.
Warm the apple topping briefly and spoon over chilled filling for a pleasant warm-cold contrast, but avoid microwaving assembled jars as the filling can separate.
This No Bake Apple Pie Cheesecake In A Jar recipe makes perfectly juicy, tender, and flavorful steak every time! Serve with potatoes and a side salad for an unforgettable dinner in under 30 minutes.
In a small saucepan over medium heat, melt 1/2 tablespoon coconut oil. Add chopped apples, 2 tablespoons brown sugar and 1/2 teaspoon apple pie spice. Cook, stirring occasionally, for about 5 minutes until apples are tender and lightly caramelized. If needed, add 1 teaspoon of water to prevent sticking.
In a mixing bowl, beat 8 ounces softened cream cheese with 6 tablespoons agave nectar until smooth. Add 2/3 cup Greek yogurt, 1 tablespoon vanilla extract and 1/2 tablespoon apple pie spice. Whip until silky and well combined, scraping down the bowl as necessary.
Divide 2 tablespoons graham crumbs among four 8-ounce jars as the base. Add 2–3 tablespoons of filling, then 2 tablespoons cooked apples. Repeat the pattern (filling, crumbs, filling) finishing with apples on top. Press layers gently to compact.
Serve immediately for warm apples and cool filling contrast, or refrigerate for 30–60 minutes for firmer texture. Store sealed in the refrigerator up to 7 days.
Last Step: Please leave a rating and comment letting us know how you liked this recipe! This helps our business to thrive and continue providing free, high-quality recipes for you.
Leave a comment & rating below or tag
@platemint on social media!

Saucy, cheesy baked ziti with ricotta and basil tastes like lasagna in half the effort, perfect for weeknights or crowds.

Quick, crowd-pleasing cheeseburger sliders baked golden with melty cheddar and savory beef. Ready in 30 minutes, great for parties and easy meal prep.

Crispy air fryer sweet potato fries with tender centers, fast-food flavor without deep frying. Ready in minutes and irresistibly snackable.
Leave a comment & rating below or tag @platemint on social media!
Enjoyed this recipe? Share it with friends and family, and don't forget to leave a review!
This recipe looks amazing! Can't wait to try it.
Comments are stored locally in your browser. Server comments are displayed alongside your local comments.

Join to receive our email series which contains a round-up of some of our quick and easy family favorite recipes.
