
>>

All the bright, savory flavors of a classic Italian sub rolled into bite-sized pinwheels—perfect for parties, snack platters, or easy make-ahead appetizers.
These Italian Sub Pinwheel Sandwiches are my go-to when I need something that tastes special without demanding a lot of time or equipment. I first put this combination together on a busy weekend when I wanted to bring something nostalgic and crowd-pleasing to a potluck. The inspiration came from a deli Italian sandwich I adored as a teenager — layered meats, tangy peppers, briny olives, and creamy cheese — all flattened into a neat, sliceable roll. Turning that into pinwheels made the flavors sing in every bite and made it easy to serve a crowd.
What makes these particularly memorable is the contrast of textures and the balance of flavors: the soft, slightly chewy tortilla; the tang and creaminess of a seasoned cream cheese spread; the salty, savory snap of salami and pepperoni; and the fresh pop of tomato and mixed greens. They’re not only visually appealing but also portable and forgiving to assemble. Once you master the spread and the rolling technique, you’ll find yourself reaching for this format whenever you need a fast appetizer that always disappears first.
I remember bringing these to a family reunion and watching several generations gather around the platter. My grandmother, who loved hearty sandwiches, declared them “just right” and kept reaching for more. The effortless assembly and the way the flavors echo a deli sub made them a hit: everyone asked for my method, and I happily shared the simple trick of patting the spread thin and rolling tightly.
What I love most is the ease with which busy-weekend ingredients transform into something festive. Once, I made half the batch the night before and the rest the morning of a bridal shower; each time the pinwheels tasted bright and delish but the make-ahead batch saved me stress. Guests always comment on how familiar the flavors are yet how fun the presentation feels, which makes them an instant favorite for gatherings.
Keep finished pinwheels in a single layer in an airtight container lined with paper towels to absorb excess moisture and maintain crispness. Refrigerate up to 72 hours; if you must hold longer, separate layers with parchment paper. Re-slicing after refrigeration is easiest with a very sharp serrated knife. Avoid freezing filled pinwheels — tortillas and fresh vegetables become limp and grainy once thawed. If prepping ahead, assemble and chill logs, then slice within a few hours of serving for the best texture and appearance.
Swap cream cheese for mascarpone for a richer mouthfeel, or use light cream cheese to shave calories, keeping in mind texture changes. Replace Genoa salami and pepperoni with sliced ham and turkey for a milder platter; use provolone, mozzarella, or Swiss if provolone isn’t available. For a vegetarian option, omit meats and add marinated artichoke hearts or roasted red peppers; consider a smoked paprika in the spread to mimic the smoky flavor. Use gluten-free tortillas for guests with celiac disease while noting the tortillas may be slightly more fragile.
Arrange pinwheels on a large platter with fresh basil or parsley sprigs for color and a drizzle of balsamic reduction for contrast. Pair with a simple antipasto board — marinated artichokes, pickled peppers, and extra olives — or serve alongside a crisp green salad or cup of minestrone for a light lunch. For parties, set out small plates of pickles and grainy mustard so guests can customize bites. Garnish individual pinwheels with a tiny basil leaf or a sliver of roasted pepper for a refined touch.
The flavors in these pinwheels are rooted in classic Italian-American deli sandwiches, which evolved from Italian immigrant traditions blending cured meats, cheeses, and vinegary accents. Pinwheels and roll-ups are an American adaptation that transforms open-faced or handheld sandwiches into bite-sized hors d’oeuvres suited to social gatherings. These compact rounds echo the same flavor combinations found in regional sub sandwiches across the United States, marrying Old World ingredients with modern party-friendly presentation.
In summer, use peak tomatoes and add thinly sliced cucumbers to keep things cool and crisp; in winter, swap fresh tomatoes for sun-dried tomatoes packed in oil for concentrated sweetness. Holiday gatherings call for richer cheese such as smoked provolone or a smear of pesto in the spread. Spring brings the opportunity to add fresh arugula or shaved asparagus for a peppery lift. Small adjustments in produce and garnishes let these pinwheels feel seasonal without changing the core assembly technique.

For easy entertaining, prepare the cream cheese spread 1–2 days ahead and store in an airtight container. Assemble logs the morning of the event and chill; this keeps the tortillas pliable but the filling firm. Use toothpicks to mark cutting points and slice into bite-size pinwheels about 1 inch thick. Transport chilled on a shallow tray lined with paper towels and re-cover with plastic wrap. Keep a small bowl of extra toothpicks available for guests, and bring a chilled platter out just before serving to maintain the freshest texture.
These pinwheels are a reliable way to bring both comfort and color to a table. They’re quick enough for weeknight entertaining and adaptable enough for special occasions — a simple, satisfying crowd-pleaser you’ll find yourself making again and again.
Remove excess tomato seeds and juice to prevent soggy tortillas.
Chill rolled logs for at least 30 minutes before slicing to get clean pinwheel edges.
Use a sharp serrated knife and slice in a single smooth motion to avoid tearing.
Pat mixed greens dry to reduce moisture in the roll.
This nourishing italian sub pinwheel sandwiches recipe is sure to be a staple in your kitchen. Enjoy every moist, high protein slice — it is perfect for breakfast or as a wholesome snack any time.
Chill the rolled logs for at least 30 minutes so the cream cheese firms and slices hold shape. Slice with a sharp serrated knife.
Store in an airtight container in the refrigerator up to 3 days. Do not freeze filled pinwheels as texture will degrade.
This Italian Sub Pinwheel Sandwiches recipe makes perfectly juicy, tender, and flavorful steak every time! Serve with potatoes and a side salad for an unforgettable dinner in under 30 minutes.
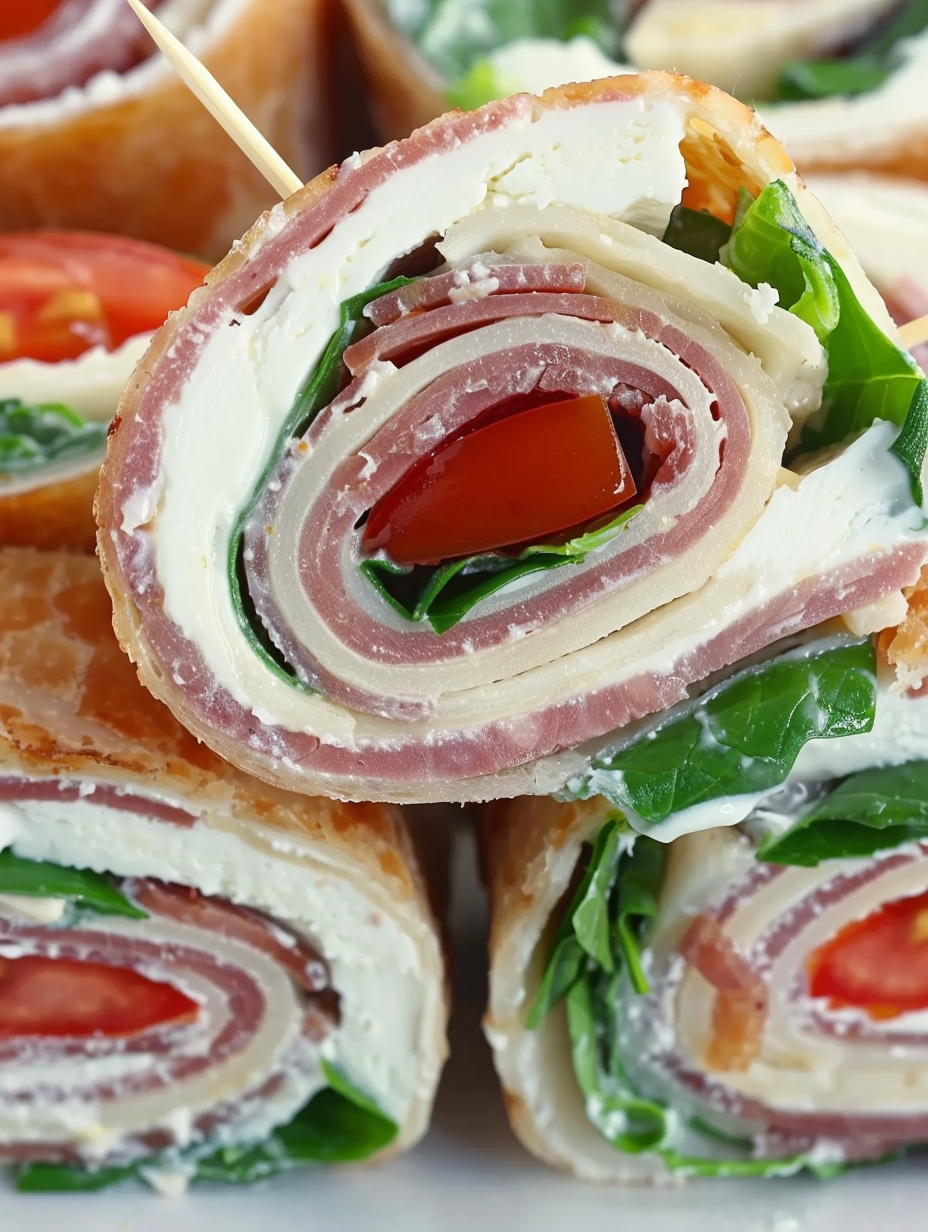
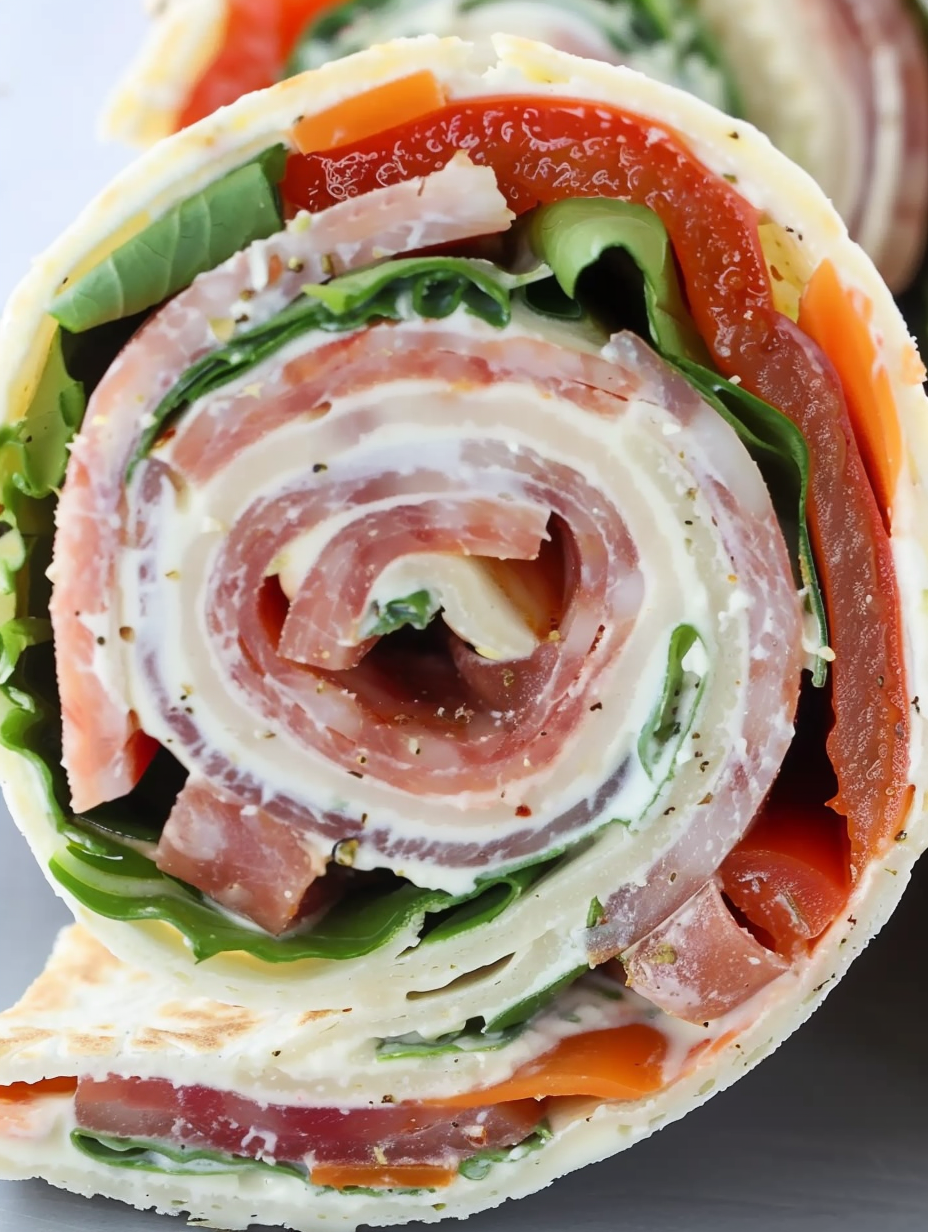
Combine softened cream cheese, Italian dressing mix, chopped banana peppers, diced red onion, sliced green onions, chopped red pepper, and drained chopped olives in a bowl. Beat until smooth and evenly combined.
Place tortillas on a flat surface and spread about 1/4 cup of the cream cheese mixture evenly on each, leaving a 1/2-inch border around the edge.
Layer four slices of Genoa salami, three slices of pepperoni, and three slices of provolone over the spread in a slightly overlapping strip to create a cohesive roll.
Top with a few tomato slices (seeds removed) and a light sprinkle of mixed greens. Roll up tightly, pressing to compact the filling, and secure with toothpicks about 1 inch apart.
Refrigerate the rolls for at least 30 minutes to firm. Remove toothpicks and slice between them into pinwheels using a sharp serrated knife.
Arrange pinwheels on a platter and serve chilled or at cool room temperature. Store leftovers in an airtight container in the refrigerator for up to 3 days.
Last Step: Please leave a rating and comment letting us know how you liked this recipe! This helps our business to thrive and continue providing free, high-quality recipes for you.
Leave a comment & rating below or tag
@platemint on social media!

Saucy, cheesy baked ziti with ricotta and basil tastes like lasagna in half the effort, perfect for weeknights or crowds.

Quick, crowd-pleasing cheeseburger sliders baked golden with melty cheddar and savory beef. Ready in 30 minutes, great for parties and easy meal prep.

Crispy air fryer sweet potato fries with tender centers, fast-food flavor without deep frying. Ready in minutes and irresistibly snackable.
Leave a comment & rating below or tag @platemint on social media!
Enjoyed this recipe? Share it with friends and family, and don't forget to leave a review!
This recipe looks amazing! Can't wait to try it.
Comments are stored locally in your browser. Server comments are displayed alongside your local comments.

Join to receive our email series which contains a round-up of some of our quick and easy family favorite recipes.
