
Easy Weeknight Beef Burritos

A straightforward, flavorful beef burrito that’s filling, family-friendly, and ready in under 45 minutes—perfect for busy weeknights.
This beef burrito recipe has been my go-to for busy weeknights for years. I discovered this combination during a stretch when I needed something quick, portable, and satisfying that would please both adults and kids. The skillet comes together fast, the aroma of sautéed onion and seasoned beef fills the kitchen, and rolling everything into warm 12-inch flour tortillas makes dinner feel homey and substantial. It’s the kind of meal that disappears fast at the table and leaves everyone asking for seconds.
What makes this version special is its simplicity. I keep the ingredient list short—lean ground beef, diced yellow onion, a packet of taco seasoning, warmed refried beans, and shredded pepper jack cheese—yet the texture contrast between creamy beans, melty cheese, and savory meat creates a comforting bite every time. I often add quick toppings like fresh cilantro or a spoonful of sour cream if I want to dress them up, but even plain rolled and lightly grilled, these burritos are a crowd-pleaser. They’re also very forgiving: swap in what you have, double the filling for freezer-friendly portions, or customize toppings for each eater.
Why You'll Love This Recipe
- Ready in about 45 minutes total, so it’s perfect for weeknights when time is short but you want a satisfying meal.
- Uses pantry staples and minimal fresh produce—ground beef, a small onion, canned refried beans, and a packet of taco seasoning—for easy shopping.
- Crowd-pleasing and customizable: add jalapeños, pico de gallo, or avocado for variety; keep plain for picky eaters.
- Make-ahead friendly: cook the filling and assemble, then finish on a skillet or freeze for later reheating.
- Portable and filling; each 12-inch tortilla becomes a complete hand-held meal with protein, carbs, and fat.
When I first served these to friends, everyone told me they tasted like a restaurant version made at home. My teenage nephew declared them better than takeout, and I love that I can customize toppings at the table so everyone gets exactly what they want. Simple, fast, and reliably delicious—what more could you ask for on a Tuesday evening?
Ingredients
- 1 pound lean ground beef (80/20): Choose fresh, bright-red beef with a bit of fat for flavor and juiciness. The 80/20 ratio gives a balance of taste and texture; leaner meat will cook drier. If you prefer, use 93/7 for a lower-fat option but add a splash of oil when cooking.
- 1 small yellow onion, finely diced: Yellow onion softens and sweetens when cooked, blending into the meat instead of competing with it. Dice small so it cooks quickly and integrates with the beef.
- 1 ounce taco seasoning (one packet): Use your favorite brand or homemade mix. The seasoning adds the signature savory-spicy profile—adjust the amount if you like it milder or hotter.
- 2 tablespoons chopped fresh cilantro (optional): Adds brightness and a herbal finish. If you’re not a cilantro fan, swap with chopped parsley for color without the cilantro flavor.
- 6 large flour tortillas, 12-inch, warmed: Large, flexible tortillas are easiest to roll and hold the filling. Warm them briefly in the microwave or on a dry skillet to prevent tearing.
- 16 ounces canned refried beans (1 can), warmed: Choose your preferred brand or style—traditional or low-fat. Warming the beans first makes spreading easier and helps everything meld when heated together.
- 1 1/2 cups shredded pepper jack cheese: Provides melt and a touch of heat. Monterey Jack or cheddar work well if you prefer milder flavor.
Instructions
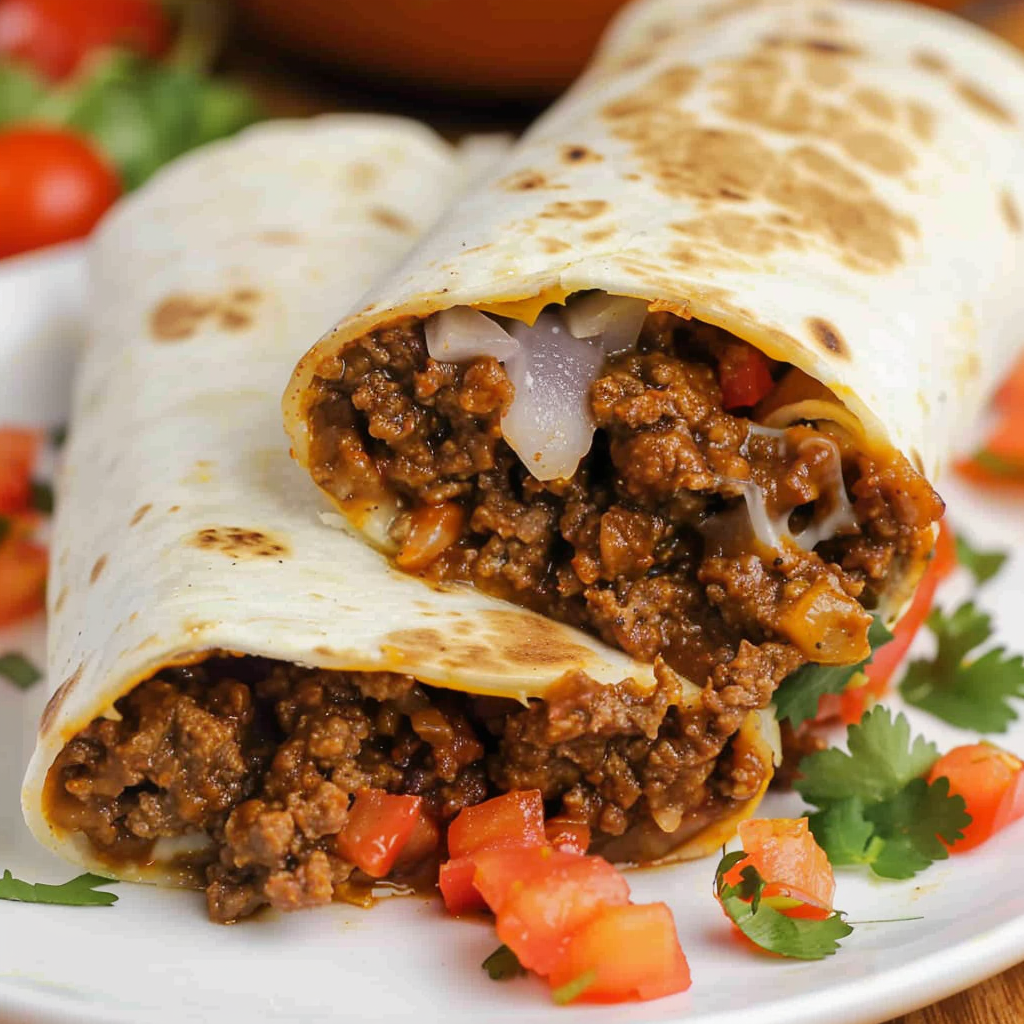
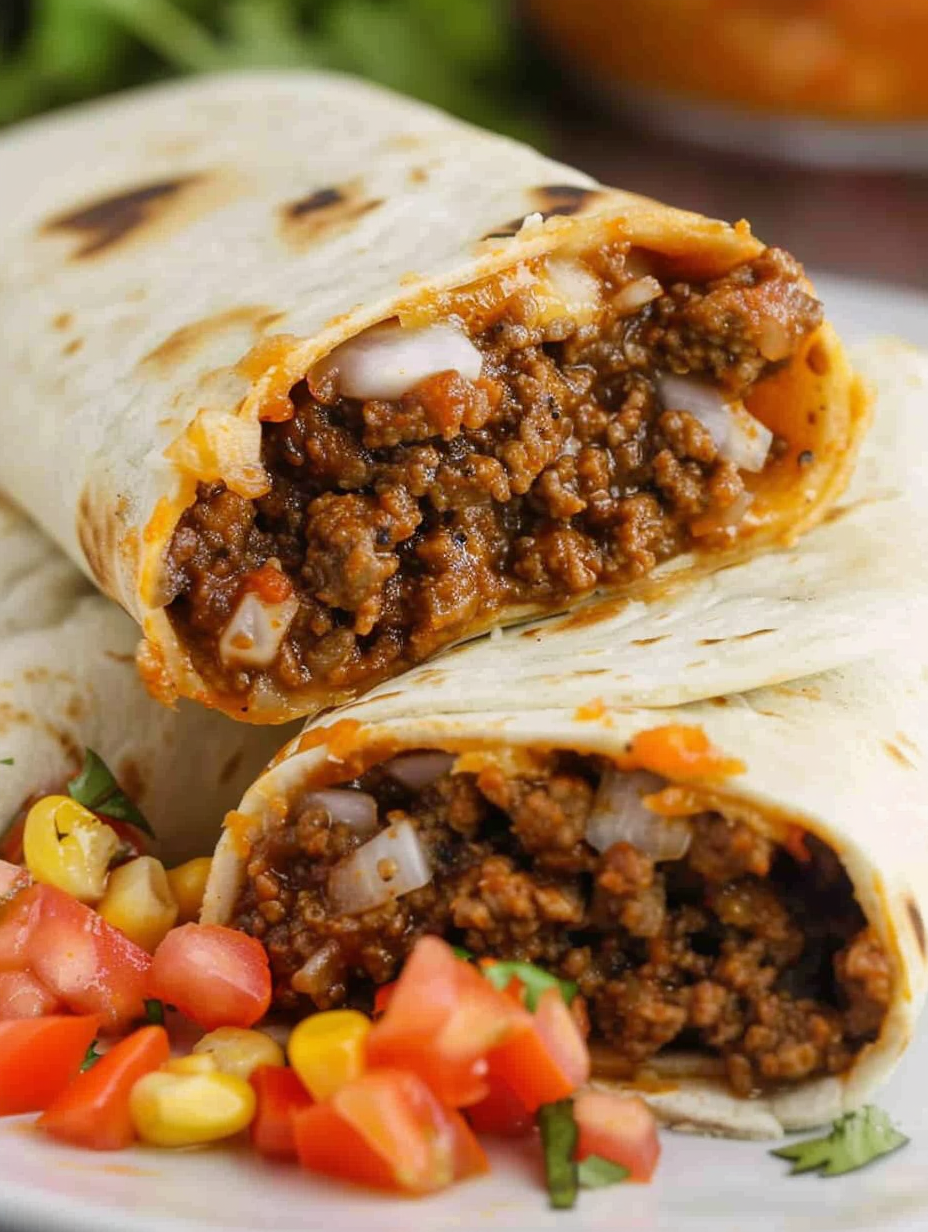
Cook the Beef and Onions: Heat a 12-inch skillet over medium-high heat. Add the ground beef and finely diced yellow onion to the hot pan. Break the meat into pieces with a spatula and cook until the beef is no longer pink and the onions are translucent, about 6 to 8 minutes. Look for a slight browning on the meat for deeper flavor. If there is excess fat, carefully drain it from the pan to avoid a greasy filling. Season the Filling: Return the skillet to medium heat, sprinkle in the 1-ounce packet of taco seasoning, and follow the packet instructions—typically adding a small amount of water (about 1/4 cup) and simmering for 1 to 2 minutes until the seasoning is evenly distributed and the liquid has mostly evaporated. Taste and adjust: add a pinch of salt if needed or a dash of hot sauce if you like extra heat. Finish the Meat: Stir in the chopped fresh cilantro if using, then remove the skillet from the heat and let the mixture rest for a minute. This resting step helps flavors settle and keeps the filling from steaming the tortillas when assembled. Assemble the Burritos: Lay the warmed 12-inch tortillas flat. Spread about 2 to 3 tablespoons of warmed refried beans down the center of each tortilla to create a cream layer that helps ingredients stick together. Spoon an equal portion of the seasoned beef mixture over the beans, and top with approximately 1/4 cup to 1/3 cup shredded pepper jack cheese per tortilla. Fold the sides in, then roll burrito-style, tucking the seam underneath to seal. Optional Skillet Crisping: For a slightly crisp exterior, heat a clean non-stick skillet over medium heat. Place burritos seam-side down and cook 2 to 3 minutes until golden and sealed. Flip and brown the other side for another 2 to 3 minutes. This step adds texture and helps hold the burrito together when serving.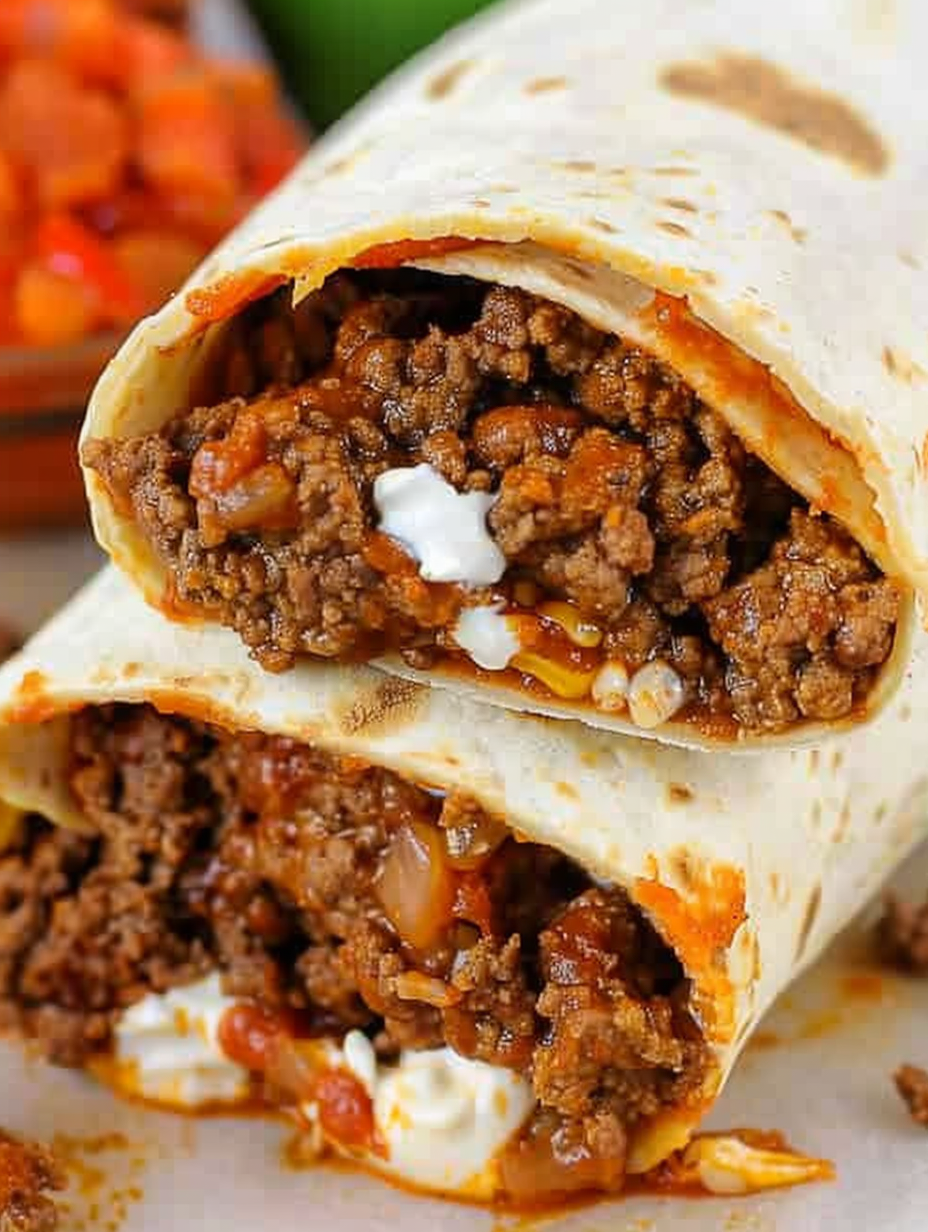
You Must Know
- High in protein and satisfying: each burrito contains about 25 grams of protein, making it a filling single-serve meal.
- Storage: assembled burritos keep in an airtight container in the refrigerator for up to 4 days; freeze individual burritos for up to 3 months.
- Freezing raw vegetables like lettuce or tomatoes inside a burrito is not recommended; add fresh toppings after reheating.
- Adjust sodium: canned refried beans and taco seasoning can be high in sodium—choose low-sodium versions if you need to control salt.
My favorite part of making these is the quick transformation from pantry items to a comforting handheld meal. Family gatherings and informal potlucks have turned into quick wins when I bring a tray of these burritos off the griddle. I often hear, "You should make a double batch," which is a great reason to prep extra filling for freezing.
Storage Tips
To store leftovers, wrap each cooled burrito individually in plastic wrap or foil and place in an airtight container. Refrigerate for up to 4 days. For longer storage, freeze wrapped burritos in a heavy-duty freezer bag for up to 3 months. To reheat, remove any plastic and rewarm in a 350°F oven for 15 to 20 minutes if frozen, or 8 to 10 minutes if refrigerated, until heated through. For a faster method, microwave on high for 1 to 2 minutes, flipping halfway, then crisp briefly in a hot skillet to restore texture.
Ingredient Substitutions
If you want to lighten the filling, substitute ground turkey or chicken for the beef and add a tablespoon of olive oil for moisture if using extra-lean meat. Swap pepper jack with cheddar for a milder profile, or use a dairy-free cheese to make it lactose-free. Use canned black beans mashed with a fork as an alternative to refried beans for a chunkier texture. For a gluten-free option, choose corn tortillas labeled 12-inch or use large gluten-free wraps—note they may be less flexible when rolling.
Serving Suggestions
Serve these burritos with a side of crisp salad or seasoned rice and beans. Offer toppings like sour cream, pico de gallo, shredded lettuce, sliced avocado, or pickled jalapeños so guests can customize. For a brunch twist, serve with a fried egg on top or sliced into rounds and arranged on a platter for party-style feeding. Garnish with extra cilantro and a squeeze of fresh lime for brightness.
Cultural Background
The filled tortilla has deep roots across Mexico and the American Southwest. While the modern burrito as we know it—large, flour-wrapped, and stuffed—became popular in northern Mexico and later in Tex-Mex cuisine, fillings vary by region. Beef and beans are classic, reflecting the practical use of shelf-stable ingredients and affordable cuts of meat. This version borrows from Tex-Mex convenience, balancing speed with traditional flavor elements like cilantro and spice blends.
Seasonal Adaptations
In summer, add fresh grilled corn, diced tomatoes, and avocado for a lighter, brighter burrito. In winter, swap in roasted sweet potatoes and warm spices like smoked paprika for extra depth. For holidays, serve a platter of smaller rolled burritos with a variety of salsas and a smoky chipotle crema to make a festive spread that’s easy to scale up for guests.
Meal Prep Tips
To meal prep, cook the beef mixture and warm the beans in large batches, then assemble burritos without crisping and store individually wrapped. Label and freeze portions for grab-and-go lunches. If preparing for the week, keep cheese separate and add just before reheating to maintain texture. Use microwave-safe containers for day-of reheating and crisp briefly in a skillet for best results.
This simple beef burrito has earned its place in my weekly rotation because it’s fast, flexible, and consistently satisfying. Make it your own with toppings and swaps, and don’t be afraid to double the filling for freezer-friendly meals that save time on hectic days.
Pro Tips
Warm tortillas briefly in the microwave wrapped in a damp paper towel to keep them pliable and prevent tearing when rolling.
Drain excess fat from the beef after browning to avoid a greasy filling; reserve a teaspoon of fat if using extra-lean meat to help flavor.
If freezing, wrap each burrito tightly in foil then place in a labeled freezer bag to prevent freezer burn and make reheating easier.
Spread a thin layer of warmed beans first to act as a binder; this prevents fillings from sliding out when rolling.
This nourishing easy weeknight beef burritos recipe is sure to be a staple in your kitchen. Enjoy every moist, high protein slice — it is perfect for breakfast or as a wholesome snack any time.
FAQs about Recipes
Can I make these ahead of time?
Yes. Assemble and refrigerate up to 4 days or freeze up to 3 months. Reheat frozen burritos in a 350°F oven for 15-20 minutes.
How do I get a crispy exterior?
Use a clean non-stick skillet over medium heat and crisp seam-side down for 2-3 minutes per side until golden.
Tags
Easy Weeknight Beef Burritos
This Easy Weeknight Beef Burritos recipe makes perfectly juicy, tender, and flavorful steak every time! Serve with potatoes and a side salad for an unforgettable dinner in under 30 minutes.
Instructions
Cook beef and onions
Heat a 12-inch skillet over medium-high. Add ground beef and diced onion. Break meat into pieces and cook 6-8 minutes until no pink remains and onions are translucent. Drain excess fat.
Add taco seasoning
Return skillet to medium heat, add the 1-ounce packet of taco seasoning and about 1/4 cup water if packet instructs. Simmer 1-2 minutes until seasoning coats meat and liquid reduces.
Finish and rest
Stir in chopped cilantro if using then remove from heat. Let mixture rest for a minute to settle flavors before assembling.
Assemble burritos
Spread 2-3 tablespoons warmed refried beans down center of each warmed tortilla. Add equal portions of meat and top with 1/4 to 1/3 cup shredded pepper jack. Fold sides and roll burrito-style, tucking seam underneath.
Optional crisping
Heat a clean non-stick skillet over medium. Place burritos seam-side down and cook 2-3 minutes per side until golden to seal and crisp the exterior.
Last Step: Please leave a rating and comment letting us know how you liked this recipe! This helps our business to thrive and continue providing free, high-quality recipes for you.
Nutrition
Did You Make This?
Leave a comment & rating below or tag
@platemint on social media!
Categories:
You might also like...

Cheesy Baked Ziti Casserole
Saucy, cheesy baked ziti with ricotta and basil tastes like lasagna in half the effort, perfect for weeknights or crowds.

Juicy Cheeseburger Sliders Bake
Quick, crowd-pleasing cheeseburger sliders baked golden with melty cheddar and savory beef. Ready in 30 minutes, great for parties and easy meal prep.

Air Fryer Sweet Potato Fries
Crispy air fryer sweet potato fries with tender centers, fast-food flavor without deep frying. Ready in minutes and irresistibly snackable.
Did You Make This?
Leave a comment & rating below or tag @platemint on social media!
Rate This Recipe
Share This Recipe
Enjoyed this recipe? Share it with friends and family, and don't forget to leave a review!
Comments (1)
This recipe looks amazing! Can't wait to try it.
Comments are stored locally in your browser. Server comments are displayed alongside your local comments.

Hi, I'm Wendie!
What's Popular

30-Minute Meals!
Join to receive our email series which contains a round-up of some of our quick and easy family favorite recipes.