
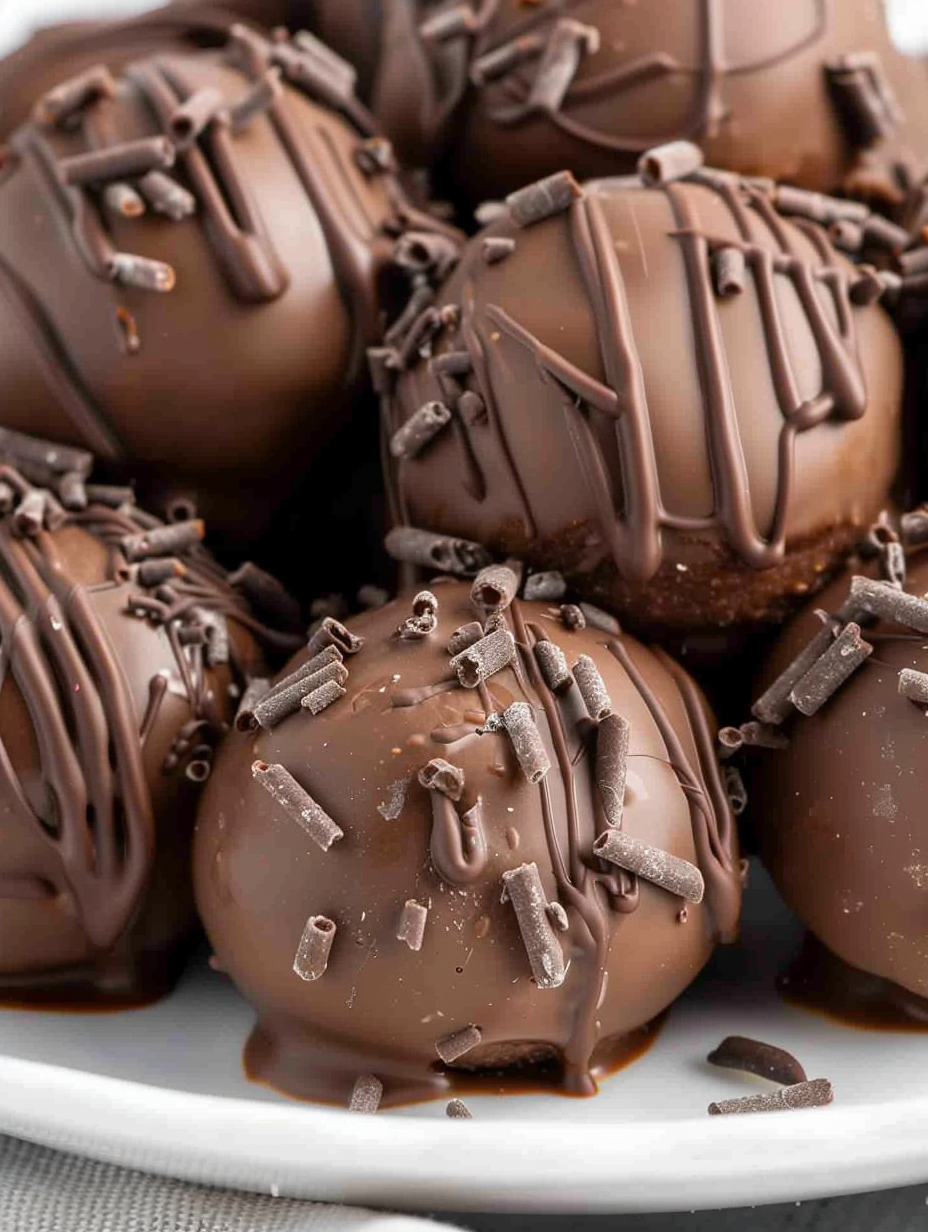
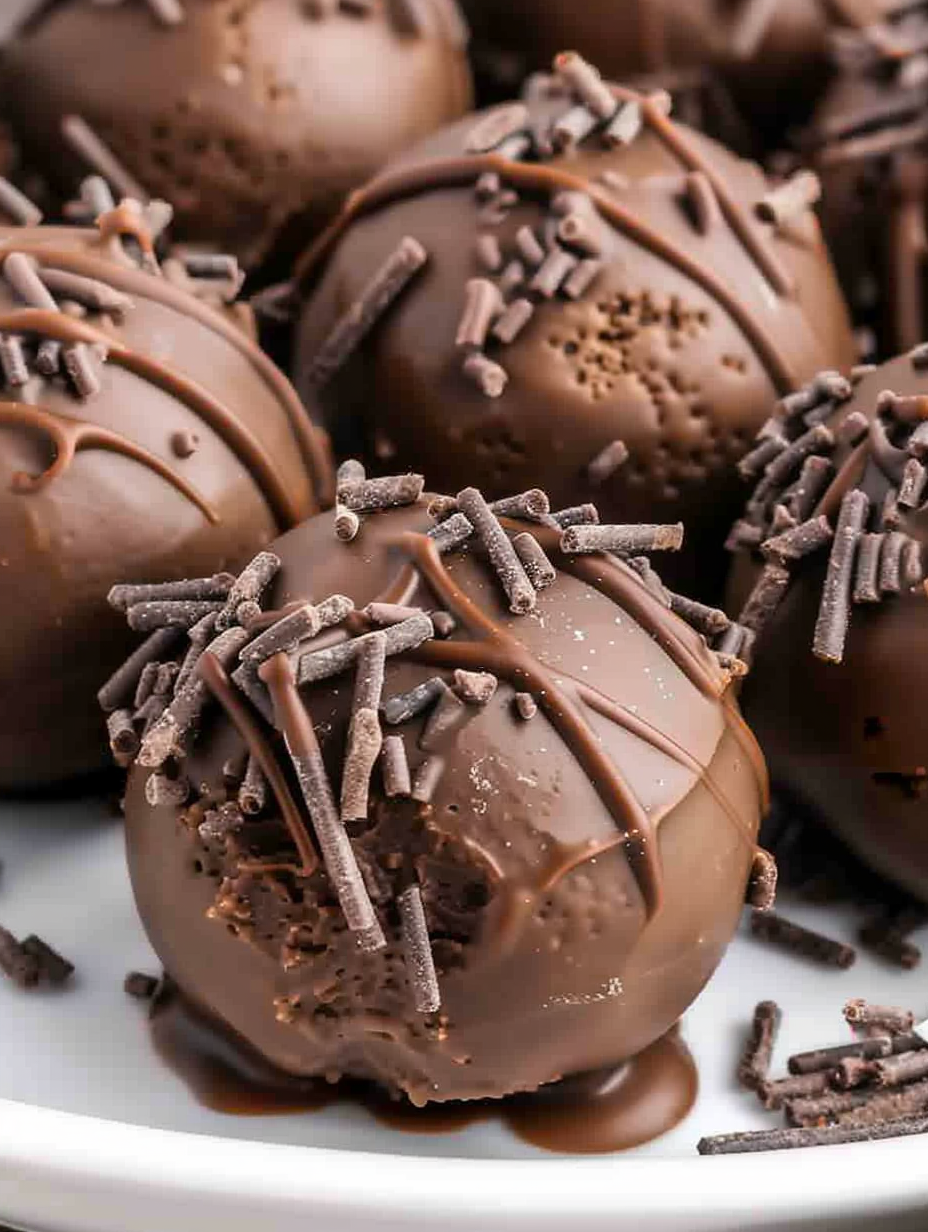
Chocolate Cheesecake Truffles

Decadent cream cheese and cake-mix centers coated in a rich chocolate shell — perfect for potlucks, parties, or an indulgent treat at home.
These chocolate cheesecake truffles have been my secret party-pleaser for years. I first made them on a rainy Sunday when I had a forgotten box of chocolate fudge cake mix and a block of cream cheese in the fridge. The combination of velvety cream cheese and the deep, chocolatey sweetness of the cake mix created a center so irresistible I knew I had to refine the method and share it. They’re small but luxurious — one bite gives you a creamy, slightly tangy interior and a crisp chocolate shell that snaps pleasingly. They work as bite-sized gifts, holiday dessert tables, or a way to keep a little luxury in the fridge for midweek dessert cravings.
I discovered early on that heat-treating the dry cake mix is the key to safety and texture; it eliminates any risk from raw flour and slightly changes how the mix binds with the cream cheese, creating a smoother, more cohesive dough. Over time I learned timing tricks — chilling long enough to prevent expansion cracks under the coating and using a small scoop for uniform bites. These truffles travel well, freeze nicely for future cravings, and reliably disappear fast whenever I bring a batch to potlucks or family gatherings.
Why You'll Love This Recipe
- Makes about 26 uniform bites that are easy to portion and share — perfect for potlucks or cookie exchanges.
- Quick active work time: only about 10 minutes of hands-on prep; most of the time is chilling, so you can multitask while they set.
- Uses pantry-friendly ingredients — a boxed chocolate cake mix and cream cheese create a decadent center without complicated steps.
- Flexible finish: coat in chocolate almond bark for a glossy shell or dip in real chocolate and top with sprinkles or nuts for variety.
- Make-ahead friendly: dough can chill overnight, and finished bites keep in the fridge for several days or freeze for months.
- Kid-friendly and crowd-pleasing — the texture balances creamy and cakey, with a chocolate shell that keeps hands clean.
I’ve watched picky eaters, college students, and holiday guests go back for seconds. Once, at a New Year’s gathering, a neighbor asked for the recipe within five minutes of trying one — that’s when I knew these needed to be part of my standard entertaining rotation.
Ingredients
- Chocolate fudge cake mix (15.25 ounces): Choose a good-quality boxed mix like Duncan Hines or Betty Crocker for consistent flavor. The dry mix provides both sweetness and structure; heat-treating it removes raw-flour concerns and slightly dries it so the cream cheese binds without becoming gummy.
- Cream cheese, softened (8 ounces): Full-fat cream cheese gives the best texture and flavor — I use Philadelphia block style. Make sure it is at room temperature for smooth mixing and to avoid lumps in the center.
- Chocolate almond bark (8 ounces): This melts reliably and sets with a shiny finish; Ghirardelli or Wilton almond bark work well. If you prefer, swap for high-quality chocolate chips tempered or melted with a teaspoon of vegetable oil for a softer shell.
- Chocolate sprinkles (2 tablespoons): For garnish and texture. Use standard jimmies or nonpareils depending on the look you want. You can also use chopped nuts, shredded coconut, or a dusting of cocoa powder.
Instructions
Heat-treat the cake mix: Pour the entire 15.25-ounce dry chocolate fudge cake mix into a medium heat-safe bowl. Microwave in two 30-second intervals, stirring between intervals so the heat distributes evenly. This step heats the flour and eliminates any food-safety concerns while slightly changing the mix’s moisture absorption — allow the mixture to cool completely to room temperature before combining with the cream cheese. Beat the cream cheese: Place the 8 ounces of room-temperature cream cheese into a medium mixing bowl. Using a handheld mixer on medium-high, beat for 2 to 2½ minutes until completely smooth and free of lumps. Scrape the sides of the bowl once or twice to ensure an even texture; a smooth base prevents streaks of unmixed cream cheese in the final bites. Incorporate the cake mix: Sprinkle the cooled dry cake mix evenly over the whipped cream cheese. Mix on low speed just until combined — don't overwork it. Stop when there are no visible pockets of dry mix and the dough holds together. The ideal consistency is soft but firm enough to scoop; if it feels too loose, chill briefly and retest. Chill the dough: Tightly cover the bowl and refrigerate for 2 hours. Chilling firms the mixture so the bites hold their shape when scooped and prevents expansion when coated. For best results, chill longer or overnight if your kitchen is warm. Scoop and shape: Line a baking sheet with parchment paper. Using a 1-tablespoon scoop, portion the dough, rolling each portion between your palms into smooth spheres. Place each ball on the prepared sheet and continue until all dough is used. A uniform scoop ensures even coating and a professional look. Melt the coating: In a microwave-safe bowl, heat the 8 ounces of chocolate almond bark in 30-second bursts, stirring between each interval until fully melted and glossy. Avoid overheating — chocolate overheats quickly and can seize. If it becomes too thick, stir in 1 teaspoon of neutral oil to loosen the texture. Coat and garnish: Dip or drizzle each chilled ball in the melted almond bark. Place the coated bites on a fork, tap to remove excess, and return to the parchment-lined tray. While the coating is still wet, sprinkle each piece with chocolate sprinkles. Use a toothpick to tidy any drips on the bottoms before the shell fully sets. Final chill and set: Refrigerate the coated bites until the shell is firm, at least 30 minutes. For best texture, allow them to rest chilled for an hour so flavors meld. Store in an airtight container in the fridge until serving.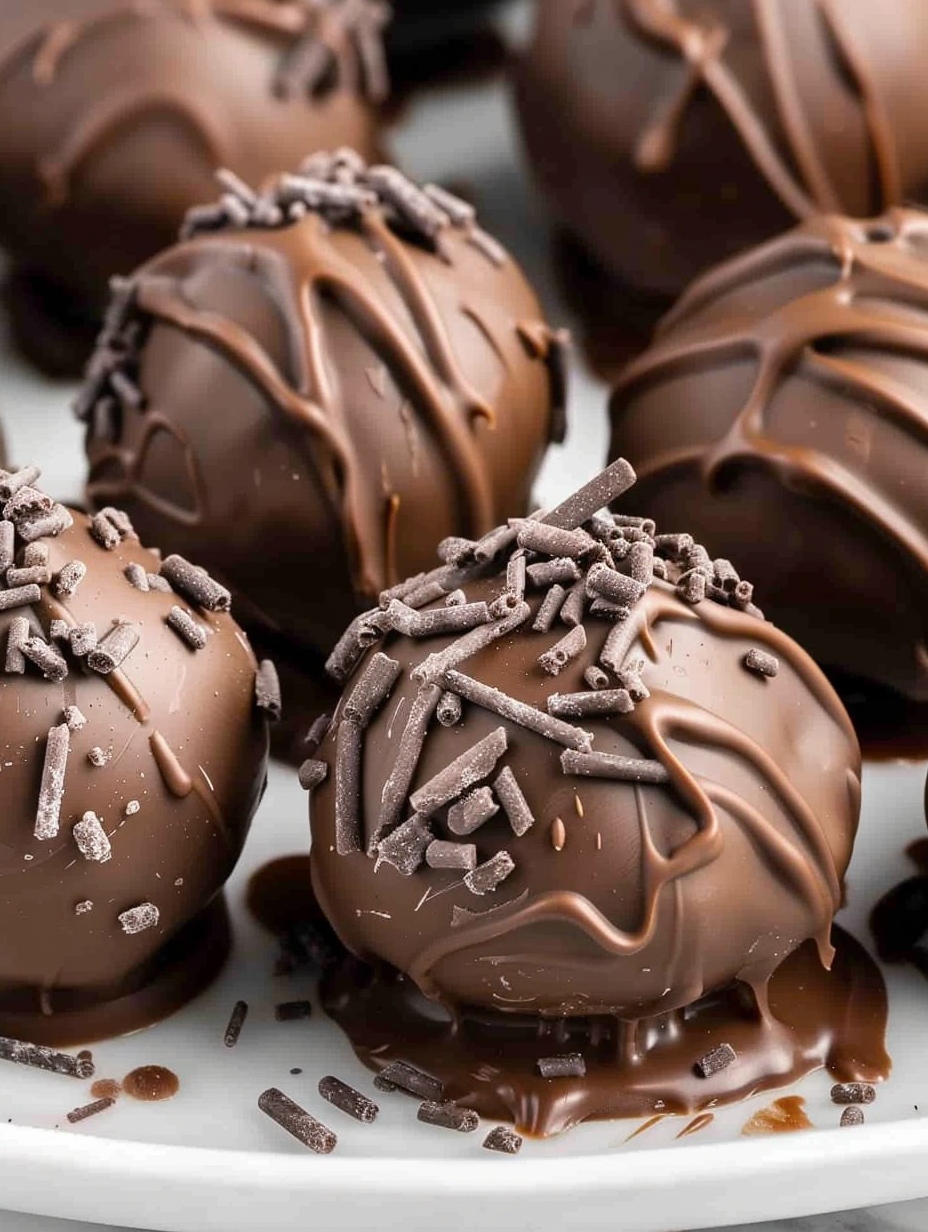
You Must Know
- Safety note: Heat-treat the dry cake mix to eliminate raw flour risks — microwaving in short bursts is simple and effective.
- Chilling matters: Allow the dough to rest for at least 2 hours; coating too soon can cause the center to expand and crack the shell.
- Storage: Finished bites keep in the refrigerator for up to 5 days and freeze well for up to 3 months when wrapped tightly.
- Nutritional snapshot: Roughly 120 calories per bite — a perfect single-serve indulgence, but portion control is key for parties.
- Allergies: Contains dairy and gluten; almond bark may include tree-nut flavoring and soy lecithin — verify labels if you have sensitivities.
My favorite thing about these bites is their versatility. I’ve adapted the topping for seasons — crushed peppermint in winter or toasted coconut in summer — and every variation has been a hit. One holiday, I wrapped small batches in parchment and ribbon; they made such delightful hostess gifts that I started keeping a batch in the freezer for last-minute present emergencies.
Storage Tips
Store finished truffles in a single layer in an airtight container in the refrigerator for up to 5 days. If stacking is necessary, separate layers with parchment paper to prevent sticking or scraping. For longer storage, freeze the uncoated or coated bites in a single layer on a tray until firm, then transfer to a freezer-safe bag for up to 3 months. Thaw in the refrigerator for several hours before serving. When reheating slightly to take the chill off, avoid warm temperatures that can soften the shell; a 10–15 minute rest at room temperature is usually sufficient.
Ingredient Substitutions
If you prefer a different base, use devil’s food or regular chocolate cake mix for a milder profile. For a gluten-free version, choose a certified gluten-free chocolate cake mix — heat-treating still applies. Swap almond bark for semisweet chocolate chips melted with a teaspoon of coconut oil for a richer, less processed shell. If dairy is a concern, try full-fat vegan cream cheese, though texture will be slightly different; refrigeration time may need adjustment. For extra crunch, roll the balls in finely chopped toasted nuts before the coating sets.
Serving Suggestions
Arrange the truffles on a small platter with fresh berries for contrast or serve them in mini paper cups for parties. They pair beautifully with espresso, dessert wine, or a small scoop of vanilla gelato. For a festive touch, dust with cocoa powder, drizzle with white chocolate, or top with a single flake of sea salt. These are also excellent presented on a dessert charcuterie board alongside cookies, dried fruit, and nuts for variety.
Cultural Background
These bites are an American home-cooking innovation that plays on classic flavors: the tang of cream cheese found in cheesecakes and the convenience of boxed cake mixes. Bite-sized sweets like these echo mid-20th-century party traditions where small, easy-to-serve confections were popular for potlucks and holidays. The method of combining cake crumbs or mix with frosting or cream cheese to form truffles is a creative shortcut that yields richly flavored, small treats without lengthy baking.
Seasonal Adaptations
In winter, fold in ½ teaspoon of ground cinnamon or a pinch of cayenne for warmth, then finish with crushed candy cane for a holiday look. In spring, swap sprinkles for chopped freeze-dried strawberries to brighten the flavor. Summer editions benefit from toasted coconut or chopped macadamia nuts for a tropical vibe. Adjust the coating: use white chocolate and add lemon zest for a spring twist, or dark chocolate plus coarse sea salt for a sophisticated autumnal bite.
Meal Prep Tips
For parties, prepare the dough a day ahead and keep it chilled; scoop the balls the morning of your event for the freshest look. If coating the same day, chill scooped balls for at least 2 hours. For a stress-free approach, freeze scooped balls on a tray, then dip from frozen — this can reduce cracking and make handling easier. Keep tools ready: extra forks, parchment paper, and a small bowl for scrap chocolate to tidy the bottoms with a toothpick for a clean finish.
These chocolate cheesecake truffles are one of those small, comforting creations that deliver big smiles. Whether you make a batch for friends, holidays, or a quiet night in, they showcase how a few simple ingredients and a little attention to technique can produce an impressive result. Give them a try, and make them your own with favorite toppings or seasonal flavors.
Pro Tips
Always bring the cream cheese to room temperature for a lump-free, smooth base.
Chill the dough for at least 2 hours before scooping to prevent spreading and to make clean balls.
If your coating thickens, stir in a teaspoon of neutral oil to restore a glossy, dip-able consistency.
Use a 1-tablespoon scoop for uniform bites and even coating.
This nourishing chocolate cheesecake truffles recipe is sure to be a staple in your kitchen. Enjoy every moist, high protein slice — it is perfect for breakfast or as a wholesome snack any time.
FAQs about Recipes
Do I need to heat-treat the cake mix?
Yes — heat-treating the dry cake mix is recommended to eliminate any concerns with raw flour. Microwaving in short bursts until warm is sufficient.
How long do these keep?
Store in an airtight container in the refrigerator for up to 5 days or freeze for up to 3 months. Thaw in the fridge before serving.
Tags
Chocolate Cheesecake Truffles
This Chocolate Cheesecake Truffles recipe makes perfectly juicy, tender, and flavorful steak every time! Serve with potatoes and a side salad for an unforgettable dinner in under 30 minutes.
Ingredients
Main
Instructions
Heat-Treat Cake Mix
Pour the 15.25-ounce dry cake mix into a heat-safe bowl and microwave in two 30-second intervals, stirring between intervals. Allow to cool completely before use.
Beat Cream Cheese
Beat 8 ounces room-temperature cream cheese in a medium bowl with a handheld mixer on medium-high for 2 to 2½ minutes until completely smooth.
Combine and Chill
Sprinkle the cooled cake mix over the cream cheese and mix until just incorporated. Cover tightly and refrigerate for 2 hours or overnight for firmer dough.
Scoop and Shape
Line a baking sheet with parchment. Use a 1-tablespoon scoop to portion the dough and roll into 26 uniform balls. Place on the prepared sheet.
Melt Coating
Heat 8 ounces chocolate almond bark in a microwave-safe bowl in 30-second bursts, stirring until smooth. If too thick, add 1 teaspoon neutral oil.
Coat and Garnish
Dip each chilled ball into the melted almond bark, tap off excess, place back on parchment, and immediately sprinkle with chocolate sprinkles. Use a toothpick to tidy any drips.
Final Chill
Refrigerate the coated bites until the chocolate shell is completely set, at least 30 minutes. Store in an airtight container in the fridge for up to 5 days.
Last Step: Please leave a rating and comment letting us know how you liked this recipe! This helps our business to thrive and continue providing free, high-quality recipes for you.
Nutrition
Did You Make This?
Leave a comment & rating below or tag
@platemint on social media!
Categories:
You might also like...

Cheesy Baked Ziti Casserole
Saucy, cheesy baked ziti with ricotta and basil tastes like lasagna in half the effort, perfect for weeknights or crowds.

Juicy Cheeseburger Sliders Bake
Quick, crowd-pleasing cheeseburger sliders baked golden with melty cheddar and savory beef. Ready in 30 minutes, great for parties and easy meal prep.

Air Fryer Sweet Potato Fries
Crispy air fryer sweet potato fries with tender centers, fast-food flavor without deep frying. Ready in minutes and irresistibly snackable.
Did You Make This?
Leave a comment & rating below or tag @platemint on social media!
Rate This Recipe
Share This Recipe
Enjoyed this recipe? Share it with friends and family, and don't forget to leave a review!
Comments (1)
This recipe looks amazing! Can't wait to try it.
Comments are stored locally in your browser. Server comments are displayed alongside your local comments.

Hi, I'm Wendie!
What's Popular

30-Minute Meals!
Join to receive our email series which contains a round-up of some of our quick and easy family favorite recipes.