
Cherry Pie Cookies

Buttery thumbprint cookies filled with bright cherry pie filling and a simple glaze. Fast to make, perfect for gatherings and weeknight baking.

This recipe for Cherry Pie Cookies grew from a desire to capture all the cozy, nostalgic flavors of cherry pie without the fuss of rolling crusts and crimping edges. I first made these on a rainy afternoon when I had a can of cherry pie filling and a craving for something sweet and shareable. The result was an instant winner: a tender, buttery cookie that cradles a glossy spoonful of cherry filling and finishes with a delicate vanilla glaze. They're one of those treats that bridge childhood memories of pie with grown-up baking convenience.
I love these cookies because they are both forgiving and fast. The dough comes together in minutes, requires minimal chilling, and bakes in a single 12 to 15 minute window. The texture is soft in the center with lightly crisped edges and the cherry filling adds a burst of acidity and sweetness that keeps each bite balanced. They are ideal for bake sales, last-minute guests, or afternoon tea. Over the years I have adapted the method to use everyday pantry staples and found small tweaks that make them reliably tender every time.
Why You'll Love This Recipe
- Ready in about 30 minutes from start to finish, making it perfect for last-minute entertaining or a quick afternoon bake.
- Uses pantry staples plus a single can of cherry pie filling, so you rarely need a special shopping trip.
- Easy technique: thumbprint-style indents rather than intricate shaping, so even beginners can achieve consistent results.
- Make-ahead friendly. Dough can be portioned and refrigerated for up to 48 hours or frozen for longer storage.
- Crowd-pleasing flavor: buttery cookie base with tangy cherry filling and a simple vanilla glaze that adds visual appeal.
- Adaptable to dietary needs by swapping key ingredients such as butter or pie filling for alternatives.
In my household these disappear faster than I expect. One holiday season I baked two dozen and they were gone in an evening; my neighbor asked for the recipe by day two. The ease combined with the classic cherry flavor makes this a repeat request whenever cherries are in season or when I want a bit of nostalgia without the labor.
Ingredients
- Unsalted butter (1/2 cup): Use real unsalted butter at room temperature for the best texture and flavor. Margarine alters the structure. I often use Land O'Lakes or Kerrygold for a rich taste. Softening to room temperature ensures easy creaming with the sugar.
- Granulated sugar (1/2 cup): Provides structure and a classic cookie sweetness. For a slight caramel note, lightly brown the sugar in advance, but standard granulated sugar works well and yields a pale cookie color.
- Large egg (1): Adds moisture, richness, and helps bind the dough. Use a fresh large egg at room temperature for smoother incorporation.
- Vanilla extract (1/2 teaspoon + 1/4 teaspoon for glaze): Pure vanilla extract adds aromatic depth. I recommend Nielsen-Massey or a quality pure extract rather than imitation for a better finish.
- All-purpose flour (1 1/2 cups): Provides the structure. Spoon and level the flour into the measuring cup to avoid dense cookies. King Arthur and Gold Medal are reliable brands.
- Baking powder (1/2 teaspoon): Gives a gentle lift without turning the cookies cakey.
- Salt (1/4 teaspoon): Balances sweetness and enhances the buttery notes. Use fine sea salt or table salt adjusted for volume.
- Cherry pie filling (as needed): One standard 21-ounce can is typically enough for 18 cookies. Choose a filling with whole cherries or halves for the best texture; try Pillsbury or a high-quality retailer brand.
- For the glaze: Powdered sugar (1/2 cup), milk (1 to 2 tablespoons), and 1/4 teaspoon vanilla extract. Use whole milk for a richer glaze or a non-dairy milk if preferred.
Instructions
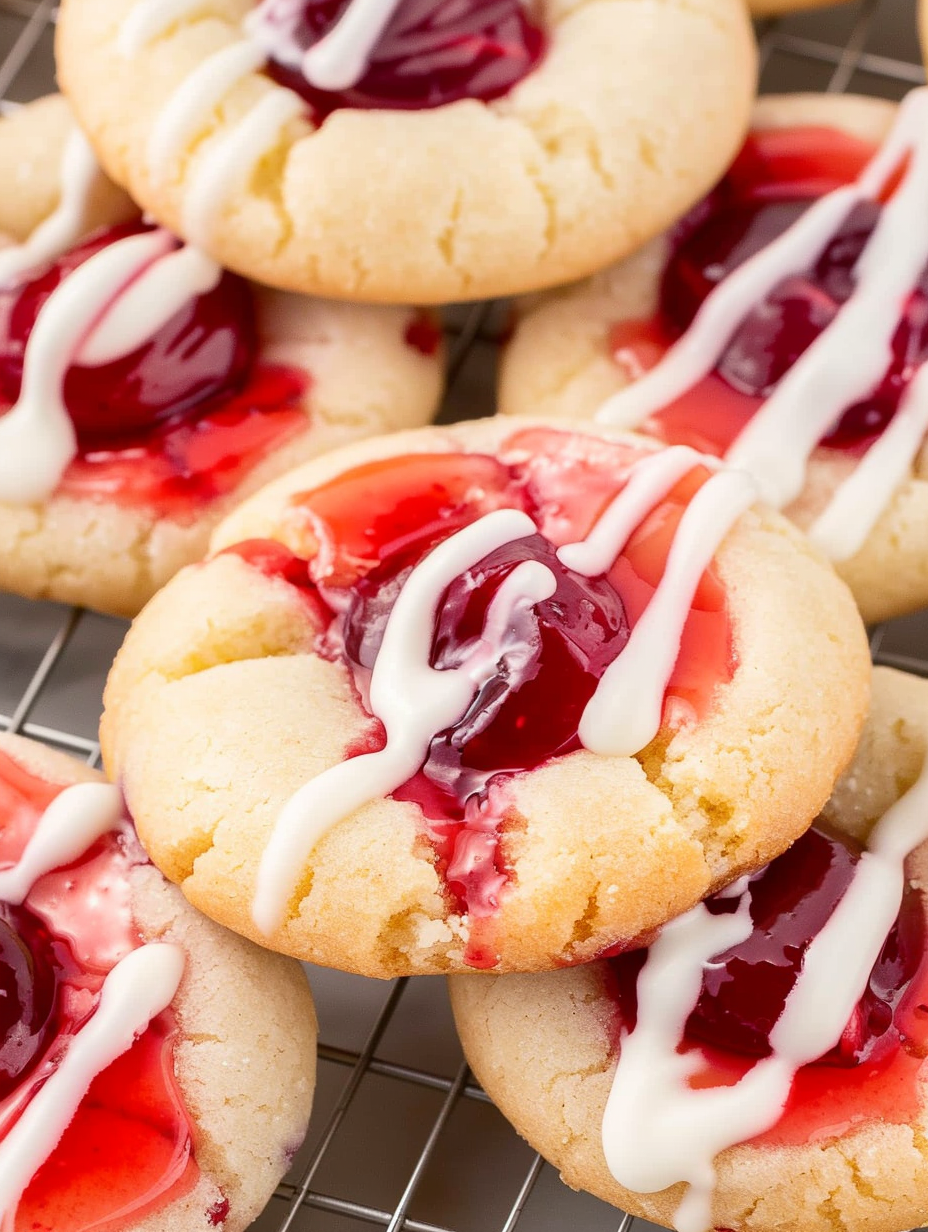
Preheat oven and prepare pans: Preheat the oven to 350°F. Line baking sheets with parchment paper and set aside. Using parchment prevents sticking and encourages even browning along the edges. Cream butter and sugar: In a large mixing bowl, cream 1/2 cup softened unsalted butter with 1/2 cup granulated sugar until the mixture is light and fluffy. If using a stand mixer, beat on medium speed for 2 to 3 minutes. The aeration from creaming gives a tender crumb and a pale, soft cookie. Add egg and vanilla: Beat in 1 large room temperature egg and 1/2 teaspoon vanilla extract until fully incorporated. Scrape down the bowl to ensure even distribution and avoid streaks of unmixed flour later. Combine dry ingredients: Whisk together 1 1/2 cups all-purpose flour, 1/2 teaspoon baking powder, and 1/4 teaspoon salt in a separate bowl. This ensures even leavening and prevents pockets of baking powder in the dough. Mix dry into wet: Gradually add the dry mixture to the butter mixture on low speed or fold by hand until just combined. Avoid overmixing to keep cookies tender; stop when there are no visible streaks of flour. Portion dough and indent: Scoop tablespoon-sized portions of dough and place them about 2 inches apart on the prepared baking sheets. Use your thumb or the back of a small spoon to press a shallow indentation into the center of each mound. The indentation should be deep enough to hold 1/2 to 1 teaspoon of filling but not so deep that the cookie becomes too thin. Fill and bake: Spoon a small amount of cherry pie filling into each indentation. Bake for 12 to 15 minutes until edges are just turning golden. Internal moisture from the filling may remain glossy; the cookie base is done when the bottoms are lightly colored and the centers feel set when touched gently. Cool and glaze: Let the cookies cool on the baking sheet for 3 to 5 minutes, then transfer to a wire rack to cool completely. Whisk 1/2 cup powdered sugar with 1 to 2 tablespoons milk and 1/4 teaspoon vanilla until smooth. Drizzle or lightly spoon the glaze over the cooled cookies and allow it to set for 10 to 15 minutes before serving.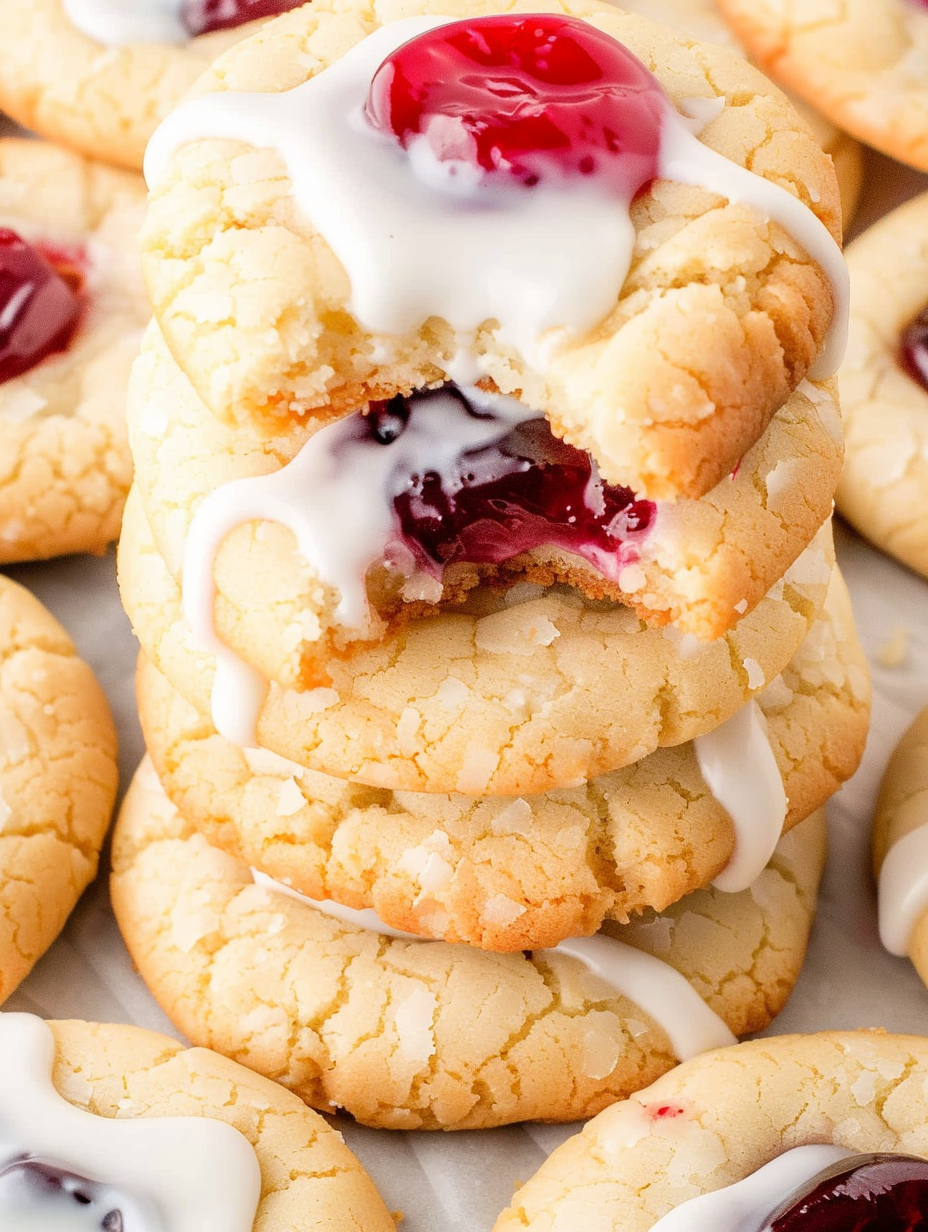
You Must Know
- These cookies keep well in an airtight container at room temperature for up to 3 days and refrigerate for up to 7 days.
- They freeze beautifully. Freeze unglazed cookies for up to 3 months. Glaze after thawing at room temperature for the best appearance.
- Nutrition per cookie: approximately 109 calories, 17 g carbohydrates, 5 g fat, and 1 g protein. They are a modest single-sweet treat when served in small portions.
- Use a gentle hand when creating the thumbprint so the cookie remains thick enough to support the filling without collapsing.
My favorite part is the contrast of textures: the soft, buttery base and the jewel-like cherry center. One winter afternoon I swapped store-bought filling for a quick stovetop cherry compote and found the fresh version added a brighter acidity that balanced the sweetness. Friends often tell me these evoke family holiday memories, which is exactly the feeling I aim for when I bake.
Storage Tips
Store the cookies in a single layer or separated by parchment in an airtight container. At room temperature they maintain their texture for about three days; refrigeration extends freshness to a week but slightly firms the cookie. For longer storage, freeze unglazed cookies on a tray until solid, then transfer to a freezer-safe container for up to three months. Thaw at room temperature and apply the glaze after thawing to retain the best appearance and shine. When reheating, warm briefly in a 300°F oven for 3 to 5 minutes to refresh the edges without melting the filling.
Ingredient Substitutions
If you need dairy-free cookies, substitute vegan butter of a high-quality brand and a non-dairy milk in the glaze. For egg-free options, use a commercial egg replacer or a flax egg made with 1 tablespoon ground flaxseed mixed with 3 tablespoons water, though texture will be slightly denser. Gluten-free all-purpose flour blends can replace the flour 1:1 in most cases; choose a blend containing xanthan gum for structure. If you prefer less sweetness, use a reduced-sugar cherry filling or drain excess syrup from the filling before spooning it into each cookie.
Serving Suggestions
Serve these as a dainty dessert at a tea, arranged on a tiered tray for holiday gatherings, or boxed in a cellophane bag with a ribbon for gifts. They pair beautifully with a cup of strong coffee or a lightly sweetened tea. For an ice-cream-centric dessert, place two cookies on either side of a scoop of vanilla ice cream to make a quick sandwich. Garnish with a light dusting of powdered sugar or a few fresh mint leaves for contrast when serving at a party.
Cultural Background
Thumbprint cookies have roots in multiple baking traditions and are often associated with Central European holiday baking, where small jam-filled cookies are common. The idea of a buttery shortbread-like base filled with preserves or pie filling is a classic technique adapted worldwide. Using cherry pie filling gives these a distinctly American twist, melding the familiar utility of canned pie filling with the hand-sized charm of traditional thumbprints.
Seasonal Adaptations
In summer, swap the canned filling for a fresh cherry compote made with pitted cherries, a splash of lemon juice, and a touch of sugar reduced to a jammy consistency. For winter, try cranberry-orange filling or apple butter to bring seasonal warmth. You can also add a teaspoon of almond extract to the dough when using cherry for an extra layer of flavor that complements stone fruit beautifully.
Meal Prep Tips
For make-ahead convenience, scoop the cookie dough onto a parchment-lined tray, then cover and refrigerate for up to 48 hours before baking. Alternatively, freeze scooped dough portions on a tray, transfer to a freezer bag, and bake from frozen—add 1 to 2 minutes to the baking time. Bake straight from the refrigerator as needed to provide fresh cookies with minimal effort. Pack baked cookies in single-serving containers for lunches or coffee breaks.
These Cherry Pie Cookies are a small, joyful bite of nostalgic flavor that are flexible and forgiving. Whether you bake a single batch for an afternoon treat or scale up for celebrations, they convey warmth and care in every cherry-studded mouthful. I hope they become a staple in your own baking rotation and inspire small creative experiments like swapping fillings or piping decorative glazes.
Pro Tips
Spoon the cherry filling gently into the indentation to avoid overflowing during baking.
If dough feels too soft for shaping, chill it in the refrigerator for 10 to 15 minutes before scooping.
Glaze the cookies only after they are fully cooled to prevent the filling from running.
Use room temperature egg and butter for even mixing and a smooth dough.
This nourishing cherry pie cookies recipe is sure to be a staple in your kitchen. Enjoy every moist, high protein slice — it is perfect for breakfast or as a wholesome snack any time.
Tags
Cherry Pie Cookies
This Cherry Pie Cookies recipe makes perfectly juicy, tender, and flavorful steak every time! Serve with potatoes and a side salad for an unforgettable dinner in under 30 minutes.
Instructions
Preheat and prepare
Preheat oven to 350°F and line baking sheets with parchment paper. This prevents sticking and encourages even browning.
Cream butter and sugar
Cream 1/2 cup softened butter with 1/2 cup granulated sugar until light and fluffy, about 2 to 3 minutes in a mixer. Proper creaming adds air for a tender texture.
Add egg and vanilla
Beat in 1 large room temperature egg and 1/2 teaspoon vanilla until fully combined, scraping the bowl as needed for even mixing.
Combine dry ingredients
Whisk 1 1/2 cups all-purpose flour with 1/2 teaspoon baking powder and 1/4 teaspoon salt to ensure even leavening.
Form the dough
Gradually add the dry ingredients to the wet mixture and mix until just combined. Avoid overmixing to keep the cookies tender.
Shape and indent
Scoop tablespoon-sized portions of dough onto prepared sheets. Press a shallow indentation in each with your thumb or the back of a spoon.
Fill and bake
Spoon cherry pie filling into each indentation and bake 12 to 15 minutes until edges are lightly golden and centers are set.
Cool and glaze
Cool on the baking sheet for a few minutes, transfer to a rack to cool completely, then whisk powdered sugar with milk and vanilla and drizzle over cooled cookies.
Last Step: Please leave a rating and comment letting us know how you liked this recipe! This helps our business to thrive and continue providing free, high-quality recipes for you.
Nutrition
Did You Make This?
Leave a comment & rating below or tag
@platemint on social media!
Categories:
You might also like...

Cheesy Baked Ziti Casserole
Saucy, cheesy baked ziti with ricotta and basil tastes like lasagna in half the effort, perfect for weeknights or crowds.

Juicy Cheeseburger Sliders Bake
Quick, crowd-pleasing cheeseburger sliders baked golden with melty cheddar and savory beef. Ready in 30 minutes, great for parties and easy meal prep.

Air Fryer Sweet Potato Fries
Crispy air fryer sweet potato fries with tender centers, fast-food flavor without deep frying. Ready in minutes and irresistibly snackable.
Did You Make This?
Leave a comment & rating below or tag @platemint on social media!
Rate This Recipe
Share This Recipe
Enjoyed this recipe? Share it with friends and family, and don't forget to leave a review!
Comments (1)
This recipe looks amazing! Can't wait to try it.
Comments are stored locally in your browser. Server comments are displayed alongside your local comments.

Hi, I'm Wendie!
What's Popular

30-Minute Meals!
Join to receive our email series which contains a round-up of some of our quick and easy family favorite recipes.