
>>

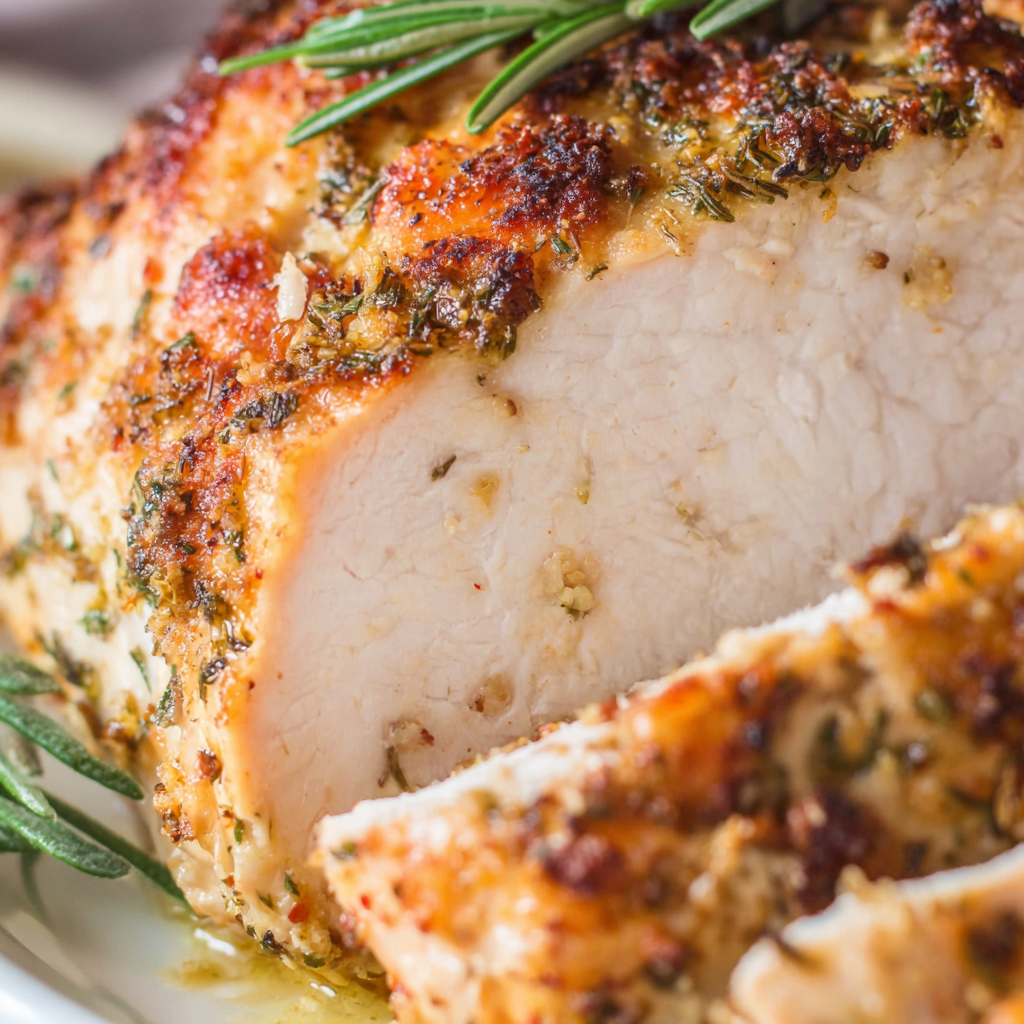
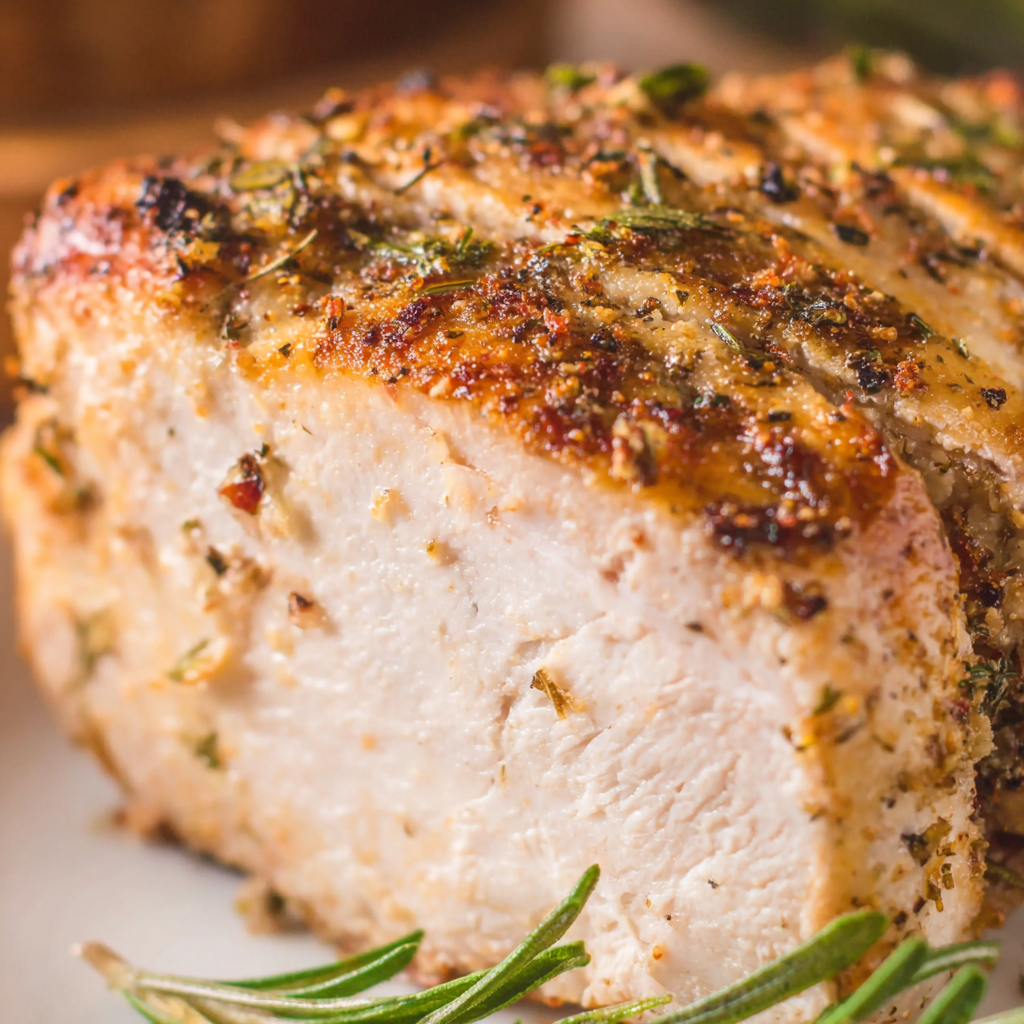
Juicy boneless turkey breast with a crisp, well-seasoned skin from the air fryer. Quick, reliable, and perfect for holidays or weeknights.

My family loves how evenly the slices carve and how every piece tastes as if it came from the center of a classic roast. The air fryer makes timing predictable, so I can focus on creamy mashed potatoes or a bright cranberry relish while the turkey quietly cooks to perfection.
What I love most about this method is how fuss-free it feels. While the turkey rests under its foil tent, the skin crackles softly and the kitchen smells exactly like a holiday roast, even on a Tuesday night. The slices fall neatly, making sandwiches, salads, and quick dinners for days without feeling like leftovers at all.
Cool the turkey completely before storing. Refrigerate sliced or whole pieces in shallow, airtight containers for 3 to 4 days. For best quality, carve and arrange slices in a single layer with a splash of stock to keep them moist, then cover tightly. Reheat covered at 300°F in the oven or air fryer for 8 to 12 minutes, or gently on the stove with a lid and a tablespoon of water per serving. Freeze tightly wrapped portions for up to 3 months; thaw overnight in the refrigerator and reheat as above. Discard if you notice off smells, sticky texture, or a grayish cast.
Olive oil can replace avocado oil 1:1, though it may brown slightly faster. Swap dried parsley with dried thyme or Italian seasoning at the same quantity for a different herb profile. Use smoked paprika instead of regular if you want a campfire note, or add 1/2 teaspoon onion powder for extra savory depth. If your turkey is skinless, brush an extra teaspoon of oil and reduce cook time by 5 to 8 minutes. For salt-sensitive diets, use 3/4 teaspoon kosher salt and add a tiny pinch at the table if needed. If you only have table salt, use 1/2 teaspoon in place of 1 teaspoon kosher.
Present the turkey on a warm platter with its juices spooned over the slices. Pair with buttery mashed potatoes, roasted green beans, and bright cranberry relish for a holiday feel. For weeknights, serve with a crisp salad, garlicky air fryer Brussels sprouts, or a quick stuffing skillet. Garnish with chopped parsley or thyme and a grind of black pepper. Leftovers are fantastic on toasted sourdough with a swipe of Dijon and crisp lettuce, or layered into grain bowls with roasted sweet potatoes and a lemony yogurt sauce.
Turkey is synonymous with American holiday tables, yet roasting a whole bird can be intimidating or impractical for smaller households. Boneless turkey breasts grew in popularity as an accessible alternative, giving the experience of a classic roast without the scale of a full turkey. The air fryer, a modern staple, echoes the results of convection roasting by circulating hot air rapidly. This method provides the golden skin and juicy interior we associate with traditional roasts, but with a fraction of the effort and time, making turkey a year-round option instead of a once-a-year project.
In autumn, add 1 teaspoon poultry seasoning and a pinch of nutmeg for cozy warmth. For spring, fold in lemon zest and fresh thyme under the skin, then finish with a squeeze of lemon juice after slicing. In summer, coat with a light brush of barbecue glaze during the final 5 minutes of cooking. For winter dinners, pair with rosemary pan sauce made by simmering chicken stock, a splash of white wine, and a knob of butter until glossy, then spoon over the warm slices for extra richness.
Cook the turkey on a Sunday, then slice and portion into airtight containers for the week. Add a tablespoon of stock to each portion to keep it moist. Store in the refrigerator up to 4 days or freeze individual packs up to 3 months. Reheat covered at 300°F until warmed through, or microwave gently at 50 percent power in 45-second intervals to prevent drying. Keep a small container of pan juices or low-sodium broth handy and splash over slices before reheating for the most tender results. Prepped this way, lunch bowls and sandwiches come together in minutes.
There is something deeply satisfying about carving into a perfectly cooked turkey breast and seeing those clean, juicy slices. Whether it is a small holiday, a cozy Sunday supper, or a make-ahead week, this air fryer method keeps the stress down and the flavor up. I hope it brings the same calm confidence to your kitchen.
Loosen the netting before cooking so it slips off cleanly after resting.
Pat the turkey very dry; moisture on the surface prevents crisp skin.
Rub dried herbs between your fingers to release aroma before mixing.
Flip halfway so both sides brown and the skin finishes crisp.
Slice across the grain into 1/2-inch slices for the most tender bite.
This nourishing air fryer boneless turkey breast recipe is sure to be a staple in your kitchen. Enjoy every moist, high protein slice — it is perfect for breakfast or as a wholesome snack any time.
Yes. If your air fryer model preheats automatically, follow the manufacturer instructions. If it does not, you can preheat at 350°F for 3 to 5 minutes, but it is not required for this method.
Use an instant-read thermometer and check the thickest part of the breast. Aim for 170°F with this method. If spots are under, cook 3 to 5 minutes more and recheck.
Yes. Season, cover, and refrigerate up to 24 hours. For the crispiest skin, leave it uncovered in the fridge during the last 2 to 4 hours to dry the surface slightly.
Rest 10 to 15 minutes so juices redistribute. Tent with foil and carve just before serving to keep the slices moist.
This Air Fryer Boneless Turkey Breast recipe makes perfectly juicy, tender, and flavorful steak every time! Serve with potatoes and a side salad for an unforgettable dinner in under 30 minutes.
Remove the turkey from the refrigerator and let it sit 20 minutes. Keep netting on, but loosen it and pull the skin evenly over the breast.
Combine granulated garlic, dried parsley, kosher salt, black pepper, and paprika in a small bowl.
Pat turkey dry. Rub with avocado oil, then coat all sides with the seasoning mix, pressing to adhere.
Place turkey in the air fryer basket skin side down with netting tucked under. Cook at 350°F for 20–25 minutes.
Flip skin side up, reposition netting below, and cook 35 minutes more or until the thickest part reaches 170°F.
Transfer to a cutting board, tent with foil, rest 10–15 minutes, remove netting, slice, and serve.
Last Step: Please leave a rating and comment letting us know how you liked this recipe! This helps our business to thrive and continue providing free, high-quality recipes for you.
Leave a comment & rating below or tag
@platemint on social media!

Saucy, cheesy baked ziti with ricotta and basil tastes like lasagna in half the effort, perfect for weeknights or crowds.

Quick, crowd-pleasing cheeseburger sliders baked golden with melty cheddar and savory beef. Ready in 30 minutes, great for parties and easy meal prep.

Crispy air fryer sweet potato fries with tender centers, fast-food flavor without deep frying. Ready in minutes and irresistibly snackable.
Leave a comment & rating below or tag @platemint on social media!
Enjoyed this recipe? Share it with friends and family, and don't forget to leave a review!
This recipe looks amazing! Can't wait to try it.
Comments are stored locally in your browser. Server comments are displayed alongside your local comments.

Join to receive our email series which contains a round-up of some of our quick and easy family favorite recipes.
